Part A: making a simple bot using Telegram
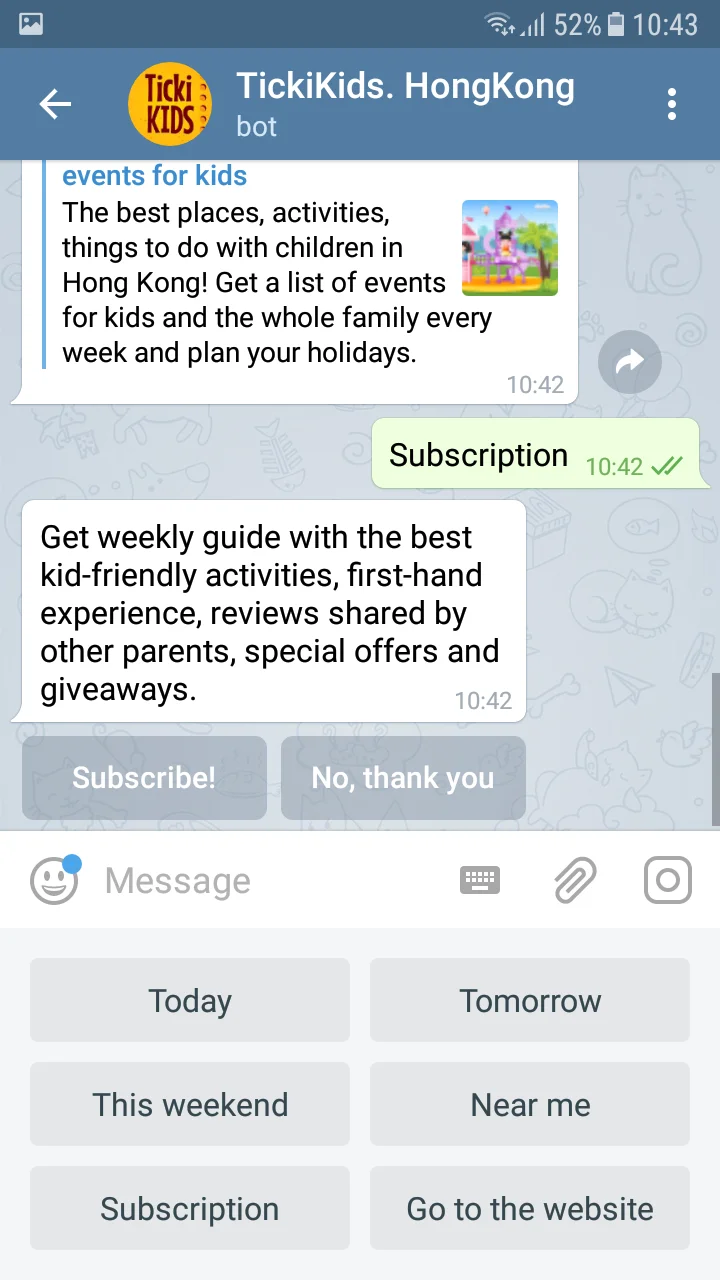
For example here there is a conversational bot that can act as a simple interface for parents to arrange some kid friendly activities…
A1 - Generating Telegram API key
- Download the telegram app on your mobile phone.
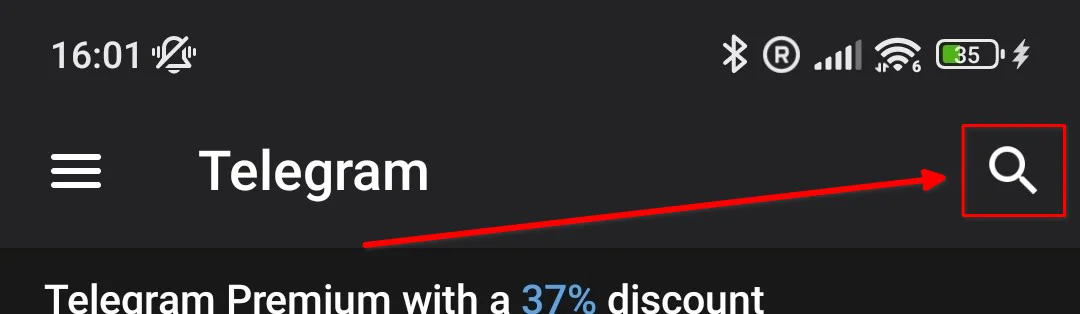
- Click on the lens icon in the top-right of the screen
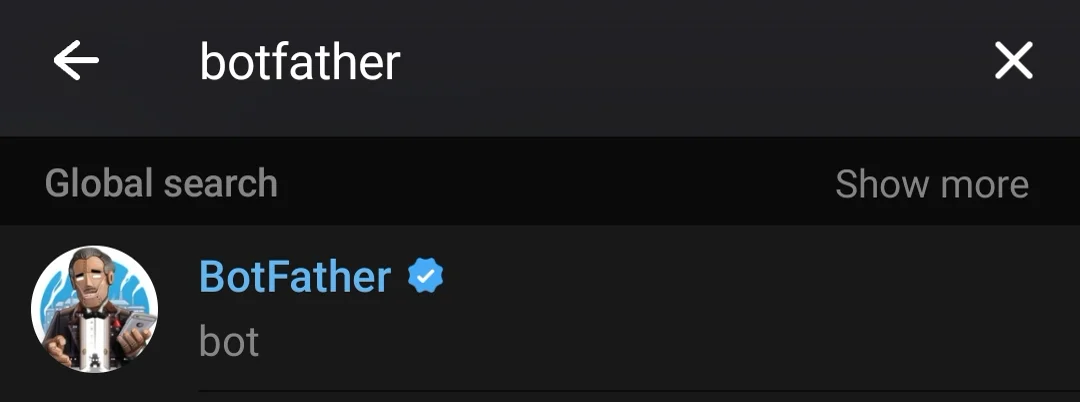
- Look for “BotFather” and click on the chat with the verified icons
- Type “/newbot” and follow the instructionsThe bot will now guide you through the creation of your own bot asking you how you want to call your bot and to give it a unique identifier that ends in “bot”.
- The bot will now send you a text looking like this:
Containing:
- A link to your bot (Red box)
- Your bot token (Green box)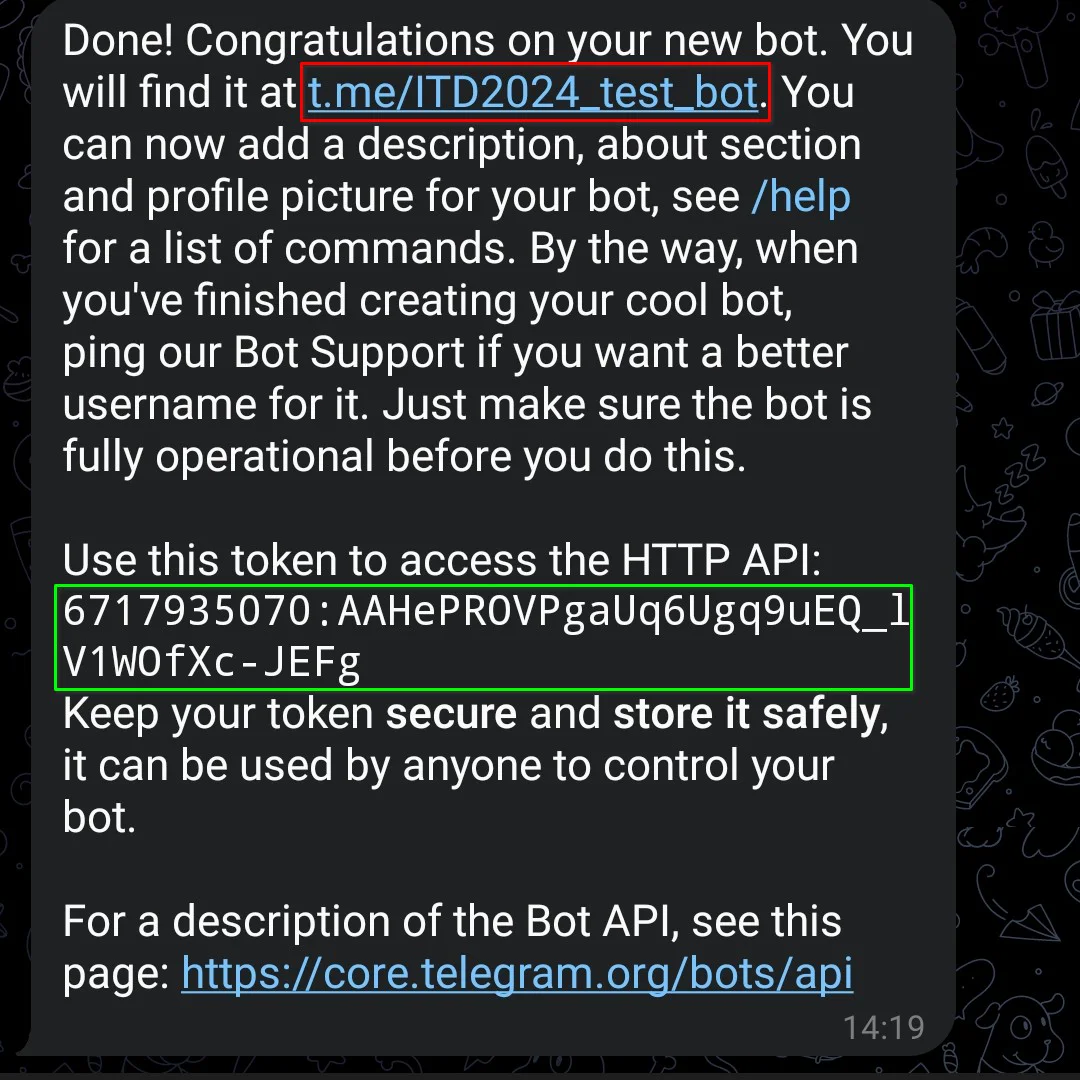
Open the first link, this will open a new telegram chat through which you will be able to interact with your bot.
A2 - Testing your telegram bot
Inserting the token
- Download and extract the code provided in a location where you can find it easily.
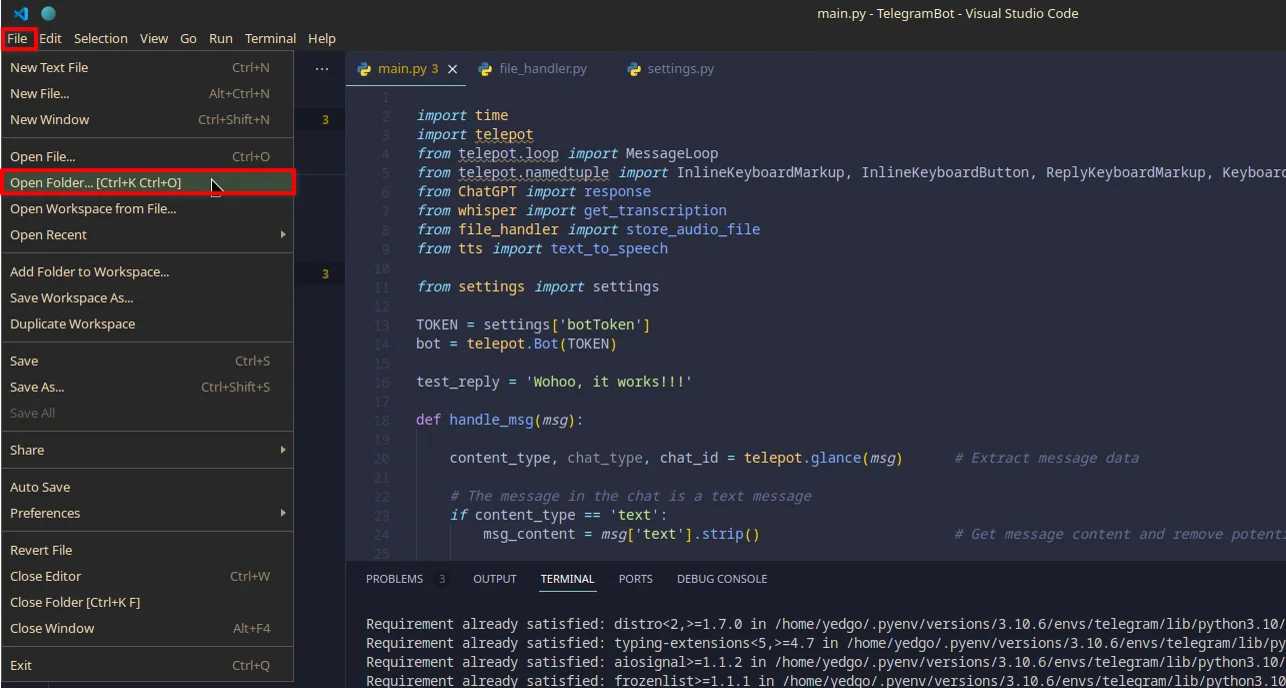
- Open VS Code, then open the extracted folder by selecting “File” in the top left of the screen and then pressing “Open folder”.
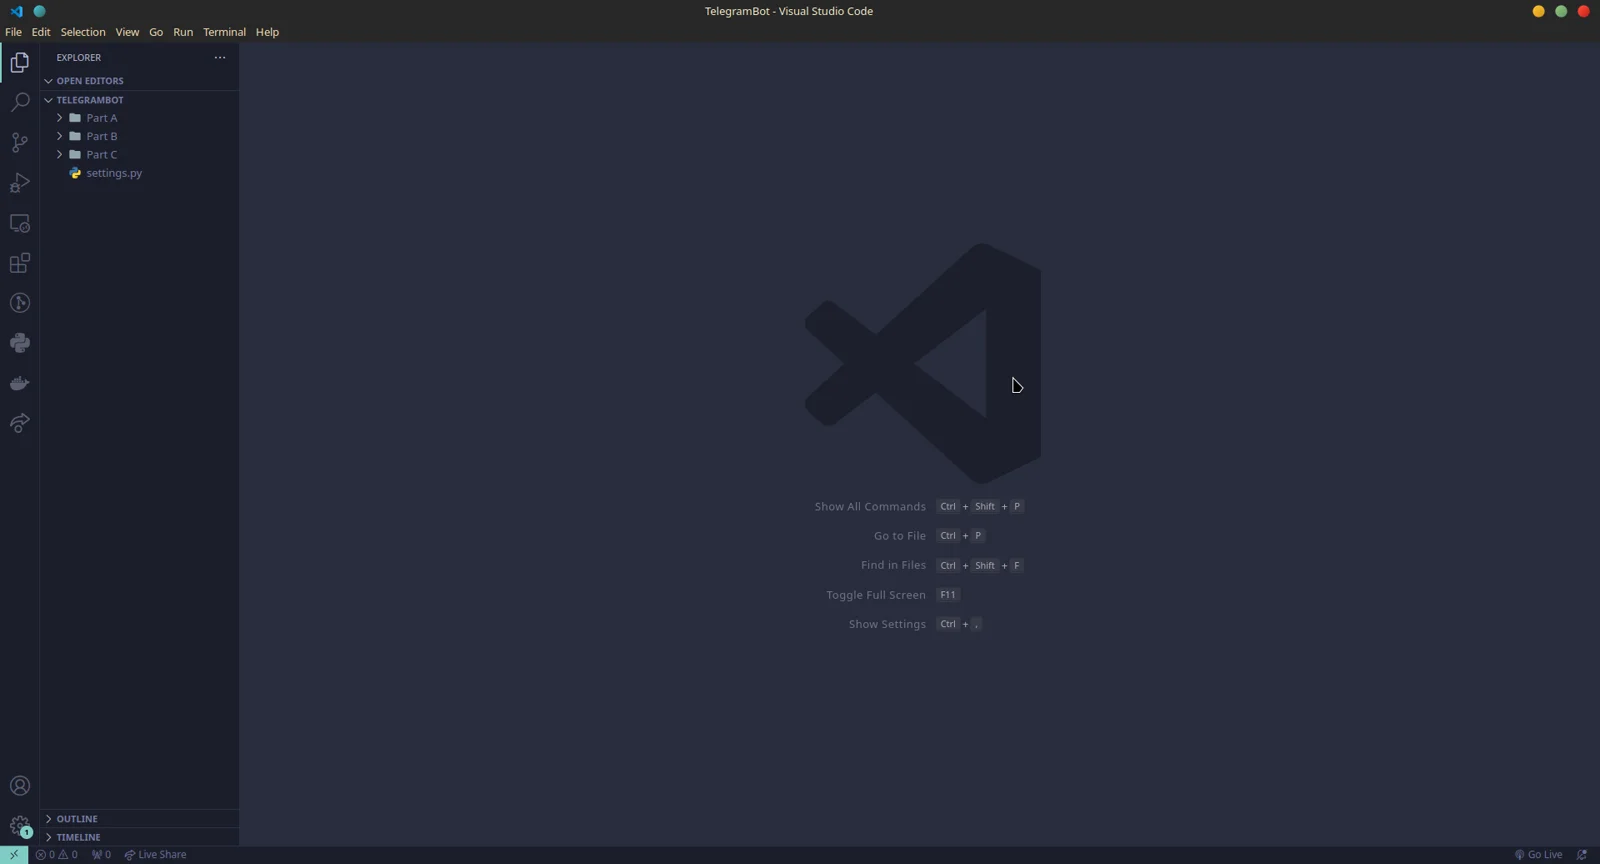
VS Code should look something like this:
- Copy the tokenfrom the previous step (You can do that easily by openingtelegram webfrom your laptop).
- Open the
settings.pyfile and replace the text that says “PASTE YOUR TOKEN HERE” with your bot token.
settings = {
	    'botToken': 'PASTE YOUR TELEGRAM TOKEN HERE',
    'openAIToken' : 'PASTE YOUR OPENAI KEY HERE'
}
Installing necessary libraries
- Open a new terminal using the menu in the top left of the screen
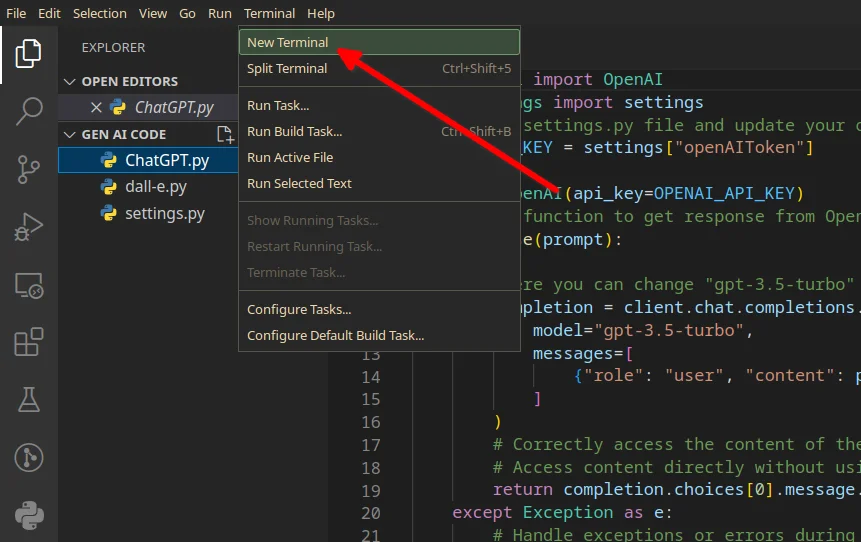
- Paste the following command and press enterwe are installing three libraries here:
telepot,request,openai,websockets, andasyncio
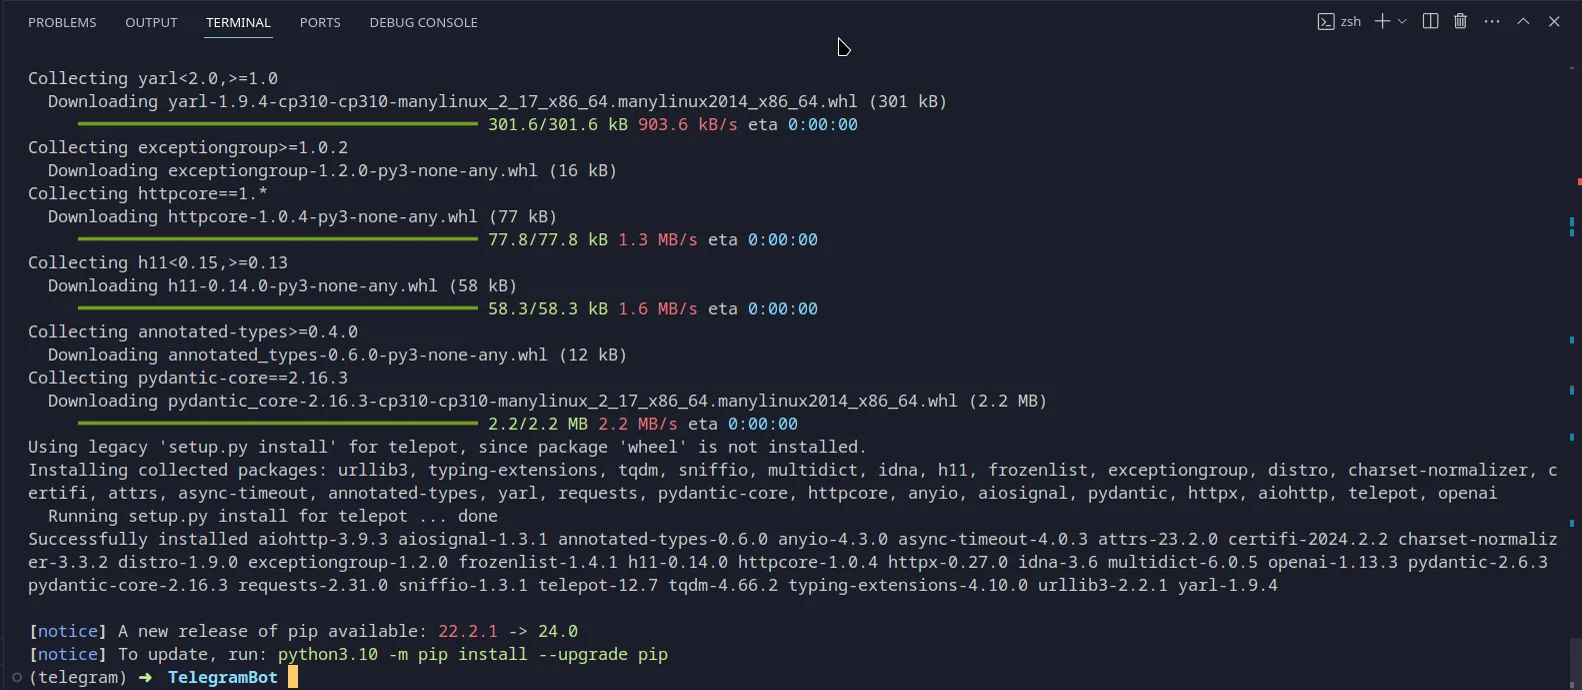
pip3 install telepot requests openai websockets asyncioA successful installation should look like this:
Testing if it works
- Open the
main.py
- In the terminal, you should see a message that says “Listening…”
- Type a message in your bot’s chat on Telegram and check if you get a response
A3 - Understanding the code
Basic bot response
def handle_msg(msg):
	  # Extract message data
    content_type, chat_type, chat_id = telepot.glance(msg)

    text = 'Wohoo it works!!!'
bot.sendMessage(chat_id, text) # Send message- The
handle_msgfunction is triggered every time the bot receives a message, this is valid not only for text messages but also for voice messages, files, emojis, etc…
- The
content_typevariable tells us what kind of message we sent, some of the types available are text, voice, sticker, photo, video, …If you want to see the full list ofcontent_typesyou can check the telepot documentation.
- The
bot.sendMessage(chat_id, text)is the function that makes the bot send a message to the telegram chat. It takes two parameters, namelychat_idandtext.chat_idis the ID of your chat, it automatically fetched from thecontent_type, char_type,chat_id= telepot.glance(msg)
so no need to worry about this
- The
textvariable specifies what text is sent by the bot, you can try to replace the text in quotes heretext = 'Wohoo it works!!!'to receive a different message from the bot.
Filtering on message content
Now let’s use the content_type and the actual content of our message to trigger specific functionalities in our code. We can do so by using if and elif statements as follows:
def handle_msg(msg):

    content_type, chat_type, chat_id = telepot.glance(msg)

    text = ''                  # Create text variable
    # perform actions when text message is received
    if content_type == 'text':
        msg_content = msg['text']  # Extract message content

        if msg_content == 'Hello': # Check if content of message is 'Hello'
            text = 'Hello there!'  # Change content of text variable
        else:
            text = "I don't understand :("

        bot.sendMessage(chat_id, text) # Send message

    # perform actions when voice message is received
    elif content_type == 'voice':

        text = 'You sent a voice message!'

        bot.sendMessage(chat_id, text) # Send message
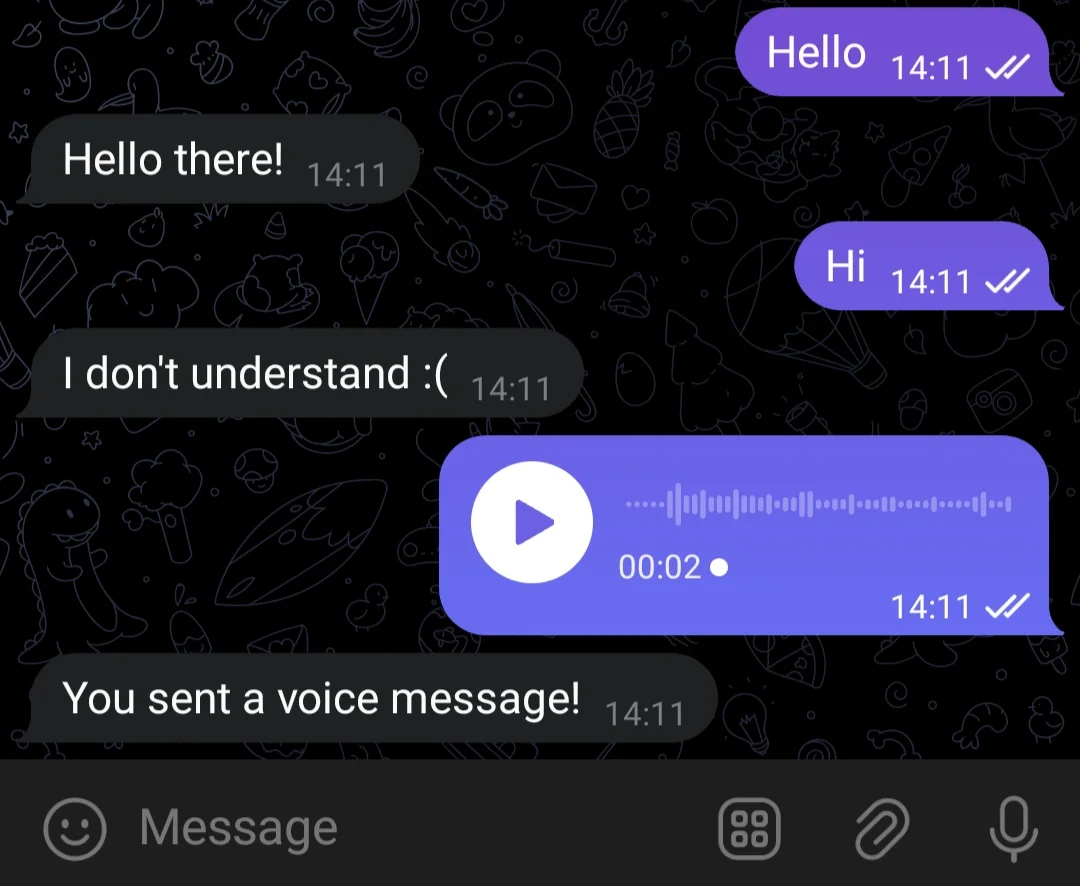
This code will check if the message sent was “Hello” and reply with “Hello there!”, otherwise it will reply with “I don’t understand :(”.
Also if you send a voice message it will reply with “You sent a voice message!”.
A4 - Custom keyboards
Custom keyboard
Using the telepot library we can do much more than just sending simple messages, for example you can create custom keyboards like this one:
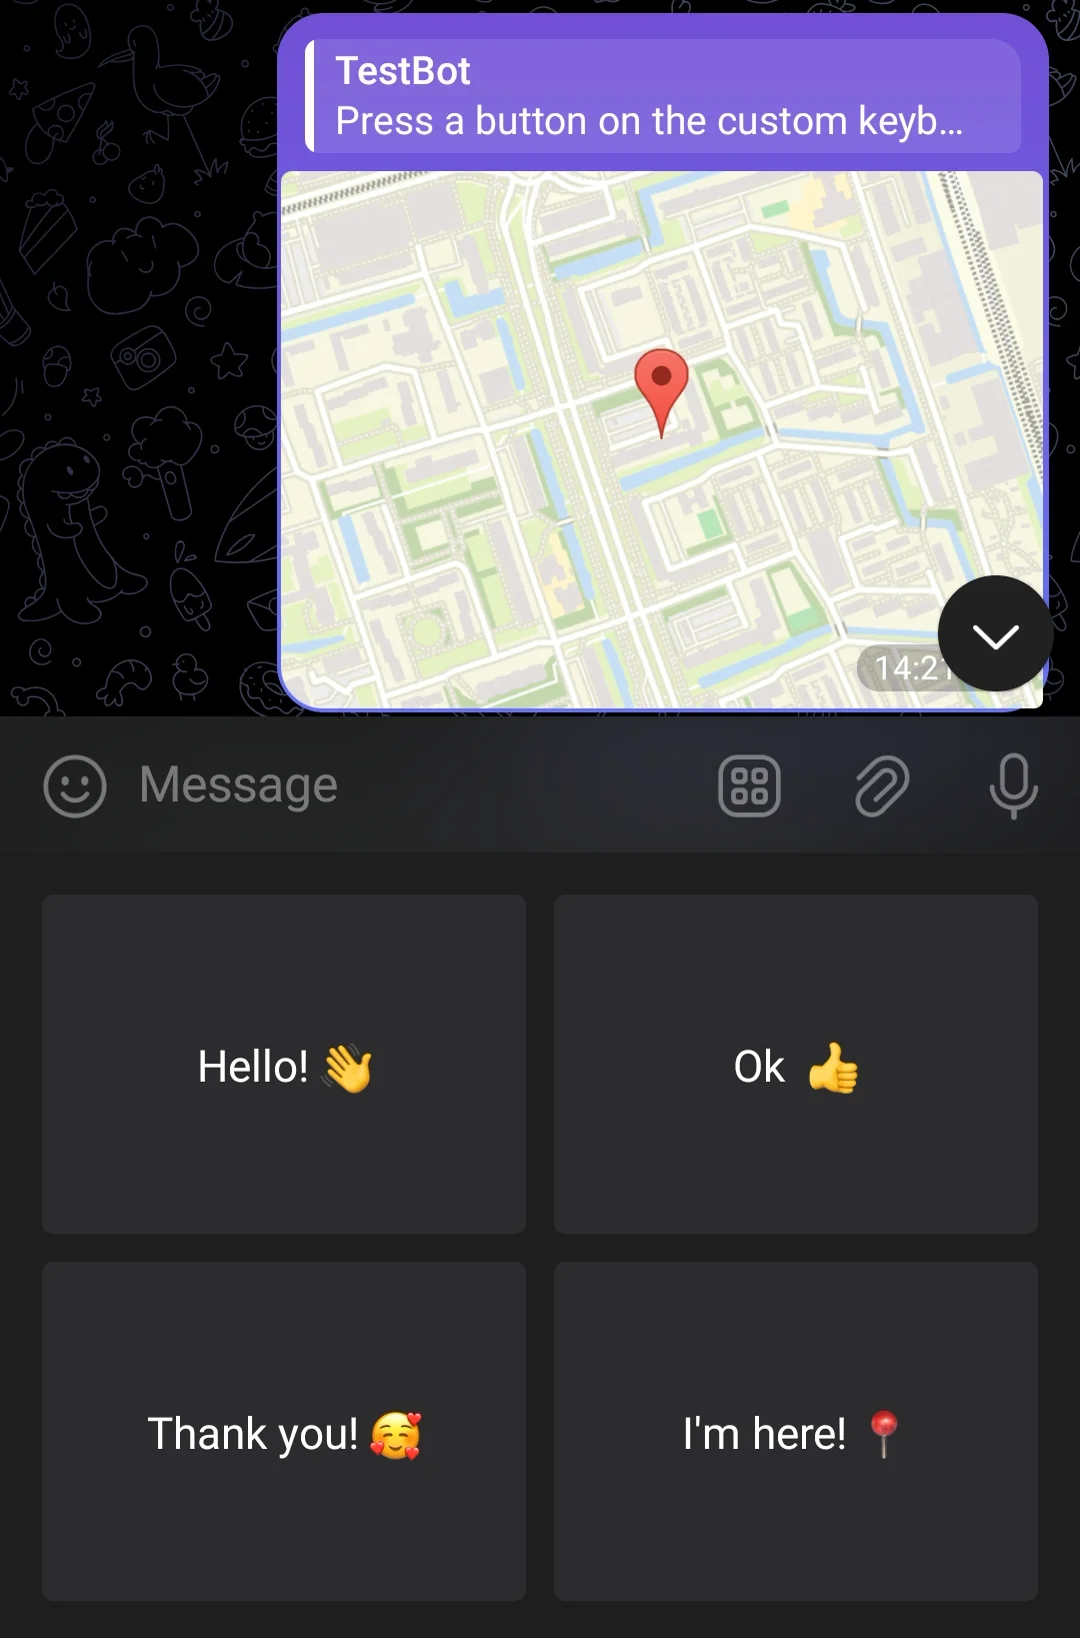
Now let’s see how we can change the existing code in order to create a custom keyboard.
Let’s copy the following code and paste it below the handle_msg function
# Generate and display a custom keyboard in the bot chat, triggered by sending "Custom keyboard"
def send_custom_keyboard(chat_id):
    custom_keyboard = ReplyKeyboardMarkup(
        keyboard=[
            [KeyboardButton(text='Send my contact', request_contact=True)],
            [KeyboardButton(text='Send my location', request_location=True)],
            [KeyboardButton(text='🎉')]
        ],
        one_time_keyboard=True,
    )

    bot.sendMessage(chat_id, 'Press a button on the custom keyboard', reply_markup=custom_keyboard) # Send custom keyboard
After pasting the function, your main.py file should now look something like this:
import sys
import time
import telepot
from telepot.loop import MessageLoop
from telepot.namedtuple import InlineKeyboardMarkup, InlineKeyboardButton, ReplyKeyboardMarkup, KeyboardButton

sys.path.append('../TelegramBot')
from settings import settings

TOKEN = settings['botToken']
bot = telepot.Bot(TOKEN)

def handle_msg(msg):
		# -------------------------------------------
    # Content of handle_msg function...
		# -------------------------------------------

# Generate and display a custom keyboard in the bot chat, triggered by sending "Custom keyboard"
def send_custom_keyboard(chat_id):
		# -------------------------------------------
    # Content of send_custom_keyboard function...
		# -------------------------------------------


# Function called by button press in Inline keyboard
def on_callback_query(msg):
    query_id, from_id, query_data = telepot.glance(msg, flavor='callback_query')
    #bot.answerCallbackQuery(query_id, text='Got it')
    bot.sendMessage(from_id, query_data)

MessageLoop(bot, {'chat': handle_msg, 'callback_query': on_callback_query }).run_as_thread()

print('Listening...')

while True:
    time.sleep(10)
Now let’s change the handle_msg function to display the custom keyboard every time we send a “Custom keyboard” message:
def handle_msg(msg):
    content_type, chat_type, chat_id = telepot.glance(msg)

    # perform actions when text message is received
    if content_type == 'text':
        msg_content = msg['text']  # Extract message content

        if msg_content == 'Custom keyboard':
            send_custom_keyboard(chat_id)   # Send custom keyboard

    # perform actions when voice message is received
    elif content_type == 'voice':

        text = 'You sent a voice message!'
        bot.sendMessage(chat_id, text) # Send message
The code above here first checks if the message sent is “Custom keyboard” and then calls the send_custom_keyboard function that we defined earlier.
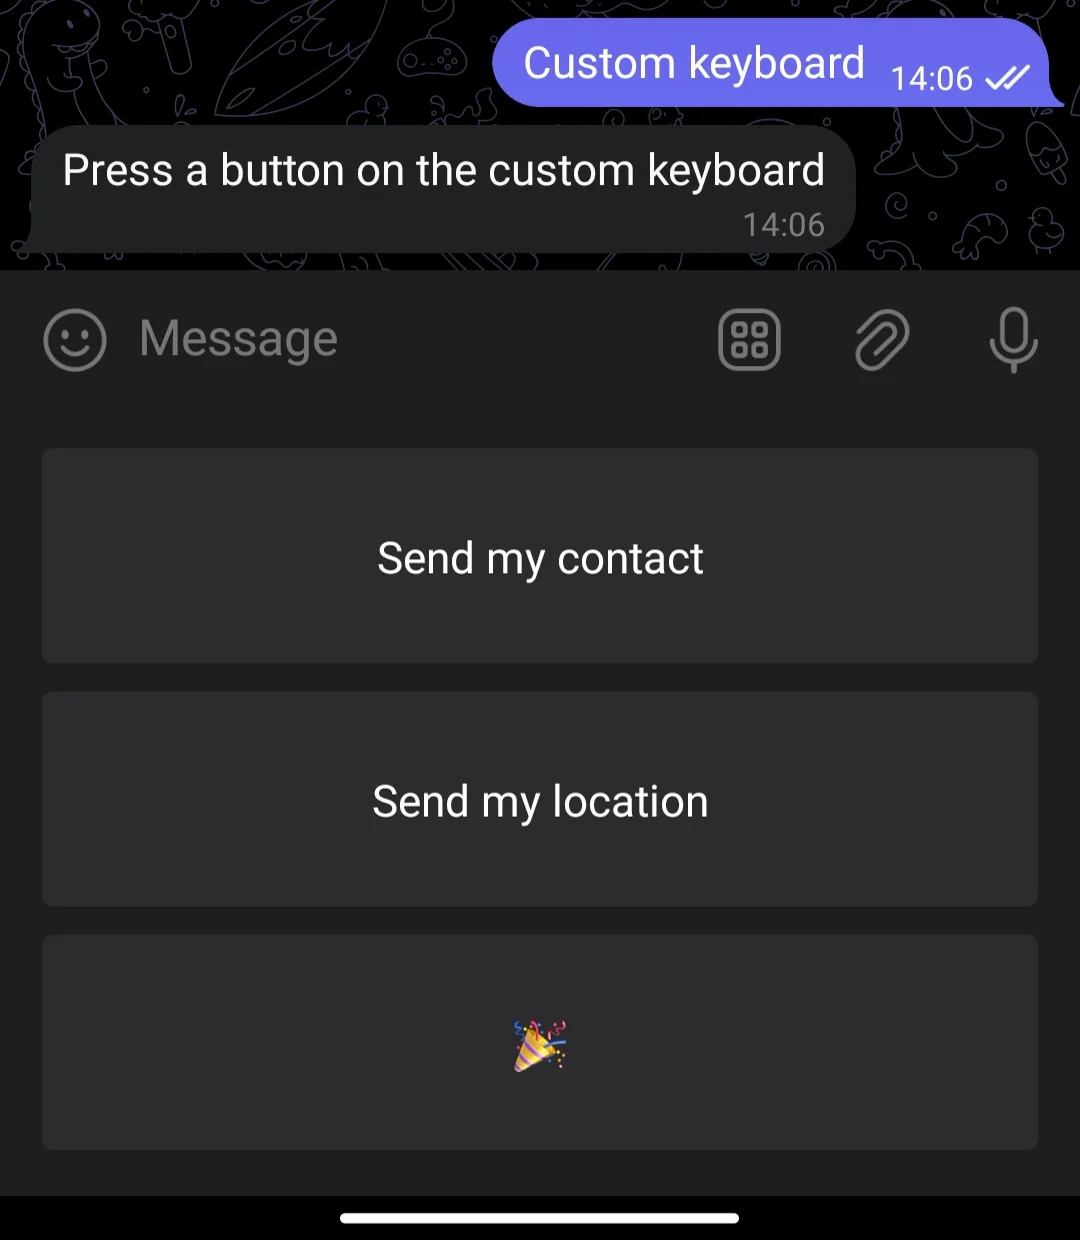
In this section of the send_custom_keyboard function we can specifiy the buttons of the keyboard and their position.
# Display buttons in a column
keyboard=[
            [KeyboardButton(text='Send my contact', request_contact=True)],
            [KeyboardButton(text='Send my location', request_location=True)],
            [KeyboardButton(text='🎉')]
        ],
This code displays 3 buttons in a single column, although we could change it to display them in a single row
# Display buttons in a row
keyboard=[[
            KeyboardButton(text='Send my contact', request_contact=True),
            KeyboardButton(text='Send my location', request_location=True),
            KeyboardButton(text='🎉')
        ]],
Or set the first button to be on the first row and the other two to be on the second row.
# Display first button in first row and other buttons in second row
keyboard=[
            [KeyboardButton(text='Send my contact', request_contact=True)],
            [
                KeyboardButton(text='Send my location', request_location=True),
                KeyboardButton(text='🎉')
            ]
        ],
Try and add more buttons following the same structure as the code provided and to display them in different layouts.
Inline keyboard
Let’s now test a different custom keyboard, telepot allows you to send inline keyboards as well which look like this:.
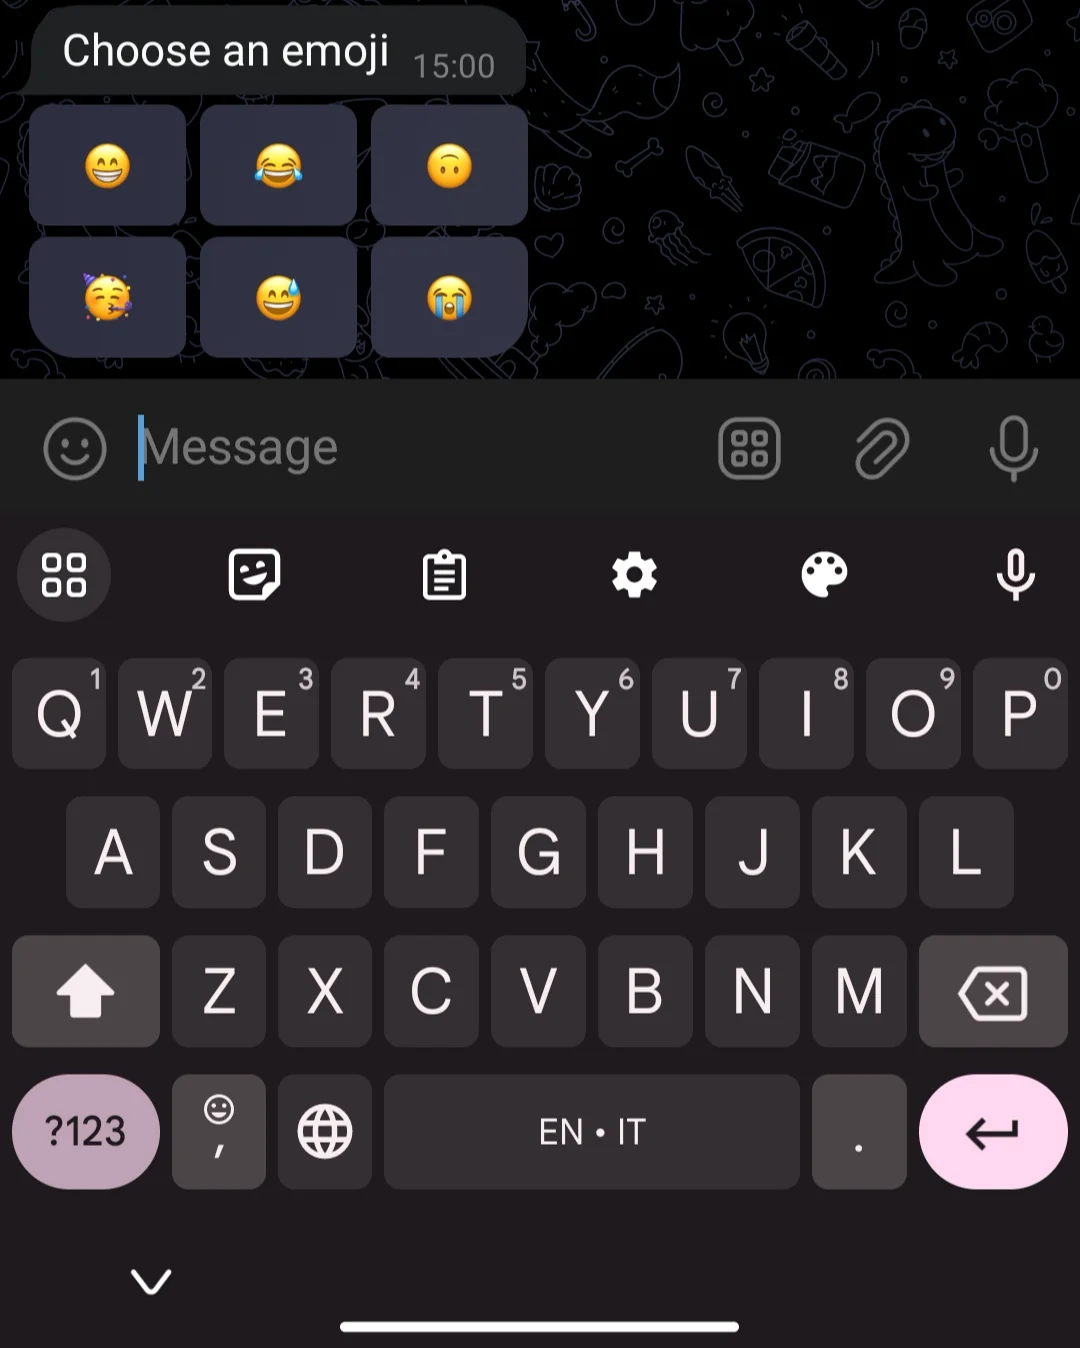
Just like before, let’s paste this new function below our send_custom_keyboard function.
# Generate and display an inline keyboard in the bot chat, triggered by sending "Inline keyboard"
def send_inline_keyboard(chat_id):
    keyboard = InlineKeyboardMarkup(
        inline_keyboard=[
            [
                InlineKeyboardButton(text='A', callback_data='You chose option A'),
                InlineKeyboardButton(text='B', callback_data='You chose option B'),
            ],
        ],
    )
    bot.sendMessage(chat_id, 'Choose one of the following options', reply_markup=keyboard) # Send custom keyboard
After pasting the function, your main.py file should look something like this:
import sys
import time
import telepot
from telepot.loop import MessageLoop
from telepot.namedtuple import InlineKeyboardMarkup, InlineKeyboardButton, ReplyKeyboardMarkup, KeyboardButton

sys.path.append('../TelegramBot')
from settings import settings

TOKEN = settings['botToken']
bot = telepot.Bot(TOKEN)

def handle_msg(msg):
		# -------------------------------------------
    # Content of handle_msg function...
		# -------------------------------------------

# Generate and display a custom keyboard in the bot chat, triggered by sending "Custom keyboard"
def send_custom_keyboard(chat_id):
		# -------------------------------------------
    # Content of send_custom_keyboard function...
		# -------------------------------------------

# Generate and display an inline keyboard in the bot chat, triggered by sending "Inline keyboard"
def send_inline_keyboard(chat_id):
		# -------------------------------------------
    # Content of send_inline_keyboard function...
		# -------------------------------------------

# Function called by button press in Inline keyboard
def on_callback_query(msg):
    query_id, from_id, query_data = telepot.glance(msg, flavor='callback_query')
    #bot.answerCallbackQuery(query_id, text='Got it')
    bot.sendMessage(from_id, query_data)

MessageLoop(bot, {'chat': handle_msg, 'callback_query': on_callback_query }).run_as_thread()

print('Listening...')

while True:
    time.sleep(10)
Now let’s change the handle_msg function again in order to display the inline keyboard:
def handle_msg(msg):
    content_type, chat_type, chat_id = telepot.glance(msg)

    # perform actions when text message is received
    if content_type == 'text':
        msg_content = msg['text']  # Extract message content

        if msg_content == 'Custom keyboard':
            send_custom_keyboard(chat_id)   # Send custom keyboard
        elif msg_content == 'Inline keyboard':
            send_inline_keyboard(chat_id)   # Send inline keyboard

    # perform actions when voice message is received
    elif content_type == 'voice':

        text = 'You sent a voice message!'
        bot.sendMessage(chat_id, text) # Send message
If we restart our bot now and text “Inline keyboard” in the chat we will see a message to which we can react.
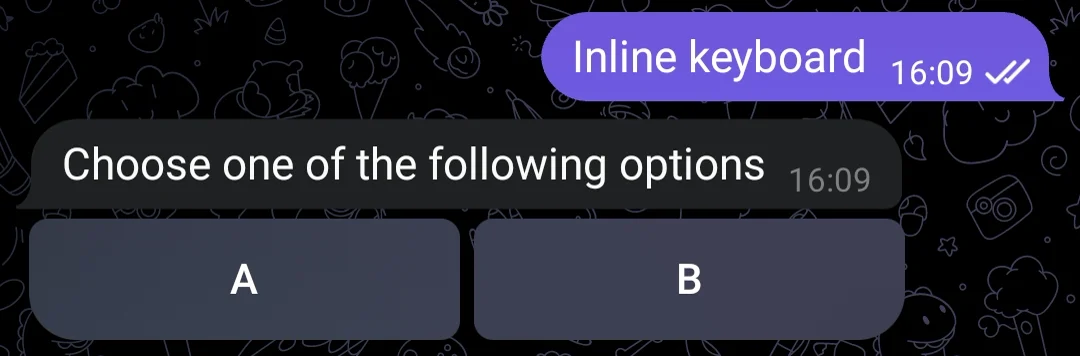
This section of the send_inline_keyboard function specifies what’s the content of the button and what is sent in the chat:
inline_keyboard=[
            [
                InlineKeyboardButton(text='A', callback_data='You chose option A'),
                InlineKeyboardButton(text='B', callback_data='You chose option B'),
            ],
        ],
You can try to add more buttons with the same structure and see how they look.
When you interact with one of the inline keyboard buttons, the on_callback_query function is triggered:
def on_callback_query(msg):
    query_id, from_id, query_data = telepot.glance(msg, flavor='callback_query')
    #bot.answerCallbackQuery(query_id, text='Got it')
    bot.sendMessage(from_id, query_data)
The function extracts the text defined in the callback_data parameter inside the InlineKeyboardButton object and sends it as a message.
In the on_callback_query function you can try and perform different actions based on the the button that was pressed using if, elif and else statements just like we did before.
To put it in simple words custom keyboards and inline keyboards are there to remove the hassle of typing when possible.
As you can see from the two code snippets below, our code changed significantly after the changes made to the handle_msg function
def handle_msg(msg):
	  # Extract message data
    content_type, chat_type, chat_id = telepot.glance(msg)


    text = 'Wohoo it works!!!'
bot.sendMessage(chat_id, text) # Send messagedef handle_msg(msg):
content_type, chat_type, chat_id = telepot.glance(msg)
# perform actions when text message is received
if content_type == 'text':
msg_content = msg['text'] # Extract message content
if msg_content == 'Custom keyboard':
send_custom_keyboard(chat_id) # Send custom keyboard
elif msg_content == 'Inline keyboard':
send_inline_keyboard(chat_id) # Send inline keyboard
# perform actions when voice message is received
elif content_type == 'voice':
text = 'You sent a voice message!'
bot.sendMessage(chat_id, text) # Send messageTry and experiment with the functionalities that we introduced to see what you can do with this bot!
If you want to check what other functionalities are available you can check the telepot documentation.
Part B: Using Telegram Bot With Gen AI
In this section, we will be looking at different generative AI’s that can help us to expand our Telegram bot.
B1 - Whisper: Speech-to-Text AI
Whisperis an AI made by OpenAI that recognizes speech and transcribes/translates it into text.
In our folder you will find a file called whisper.py. Let’s open it in Visual Studio Code.
from openai import OpenAI
import sys
sys.path.append('../TelegramBot')
from settings import settings

#go to the settings.py file and update your own token from openai
OPENAI_API_KEY = settings["openAIToken"]

client = OpenAI(api_key=OPENAI_API_KEY)

def get_transcription(file_path):
    transcription = client.audio.transcriptions.create(
        model="whisper-1",
        file=open(file_path, "rb")
    )

    return transcription.text
This is how the code looks. The speech to text function receives the path to a file of which the AI will be transcribing.
Let’s try this out right away. Add the following code at the end of the file.
print(get_transcription("./Part B/test_audio.mp3"))Make sure you don’t have any at the beginning of the code.
This line runs the speech to text method for the test_audio.mp3 file we have in the folder. This is a audio file of the poet William Carlos reading his Poem “The Red Wheelbarrow”.
As a result, you will find the poem being printed in the terminal.
You can try this with other audio files you like to test with. To check what other functionalities Whisper can provide or which file extensions it supports, read OpenAI’s manual:
https://platform.openai.com/docs/guides/speech-to-text
B2 - TTS: Text-to-Speech AI
TTS is an AI also made by OpenAI that turns a text into audio.
We also have tts.py in our folder. Let’s have a look at it.
from pathlib import Path
from openai import OpenAI
import sys
sys.path.append('../TelegramBot')
from settings import settings
import warnings
warnings.filterwarnings("ignore", category=DeprecationWarning)
#go to the settings.py file and update your own token from openai
OPENAI_API_KEY = settings["openAIToken"]

client = OpenAI(api_key=OPENAI_API_KEY)

def text_to_speech(text):
  speech_file_path = Path(__file__).parent / "voice_response.mp3"
  response = client.audio.speech.create(
    model="tts-1",
    voice="alloy",
    input=text
  )

  response.stream_to_file(speech_file_path)
The text to speech function gets two variables: the text it has to convert, and the path it has to save the generated audio. Let’s try it out.
Add the following code at the end of the file:
paragraph = f"""
Balloons are pretty and come in different colors, different shapes, different sizes, and they can even adjust sizes as needed. But don't make them too big or they might just pop, and then bye-bye balloon. It'll be gone and lost for the rest of mankind. They can serve a variety of purposes, from decorating to water balloon wars. You just have to use your head to think a little bit about what to do with them.
"""
text_to_speech(paragraph)
Let’s save and run the code. After a bit of time, you will find a file called voice_response.mp3 in the explorer tab. If you play the file you will see that it is exactly the text we gave to the AI.
Try changing the text and the file path to get a better understanding of how the function works. Also, to find out more about available voice, file format, languages etc, check out OpenAI’s manual:
https://platform.openai.com/docs/guides/text-to-speech
B3 - Expanding the Telegram Bot
Let’s go back to the Telegram bot we created in the previous tutorial. Can we make our bot smarter using these AI’s?
Using Voice Messages in Telegram Bot
Now that we can send and receive text messages, let’s see how we can expand our bot so that it can process voice messages and even send one to us.
We will do this in following steps:
- Make our bot recognize voice messages
- Transcribe the voice message into text
- Use ChatGPT API to generate a response
- Use text to speech to generate audio
- Send the audio as a voice message
Open main.py in your Visual Studio Code. Don’t worry about having to alter the codes for now, as everything is in there already. Let’s go through the code to understand what they do step-by-step.
Below is the whole main.py code:
import sys
import time
import telepot
from telepot.loop import MessageLoop
from telepot.namedtuple import InlineKeyboardMarkup, InlineKeyboardButton, ReplyKeyboardMarkup, KeyboardButton
from chat_gpt import response
from whisper import get_transcription
from file_handler import store_audio_file
from tts import text_to_speech

sys.path.append('../TelegramBot')
from settings import settings

TOKEN = settings['botToken']
bot = telepot.Bot(TOKEN)

test_reply = 'Wohoo, it works!!!'

def handle_msg(msg):

    content_type, chat_type, chat_id = telepot.glance(msg)      # Extract message data

    # The message in the chat is a text message
    if content_type == 'text':
        msg_content = msg['text'].strip()                       # Get message content and remove potential whitespaces on the sides

        if msg_content == 'Custom keyboard':
            send_custom_keyboard(chat_id)
        elif msg_content == 'Inline keyboard':
            send_inline_keyboard(chat_id)
        else:
            bot.sendMessage(chat_id, test_reply)


    # The message in the chat is voice message
    elif content_type == 'voice':
        # Save the voice message as "voice_message.ogg"
        file_name = "Part B/voice_message.ogg"
        store_audio_file(bot, msg, file_name)   # Use file_handler.py's store_audio_file function

        # Transcribe voice message to text
        transcription = get_transcription(file_name)    # Use whisper.py's get_transcription function
        print("Received message: " + transcription)

        # Generate response with ChatGPT
        print("Generating a response...")
        answer = response(transcription)    # Use chat_gpt.py's response function

        # Convert the response into speech
        print("Saving response as a voice file...")
        text_to_speech(answer)              # Use tts.py's text_to_speech function
        print("Audio saved as voice_response.mp3")

        # Send voice message in Telegram
        bot.sendVoice(chat_id, open("Part B/voice_response.mp3", "rb"))


# Generate and display a custom keyboard in the bot chat, triggered by sending "Custom keyboard"
def send_custom_keyboard(chat_id):
    keyboard = ReplyKeyboardMarkup(
        keyboard=[
            [KeyboardButton(text='Send my contact', request_contact=True)],
            [KeyboardButton(text='Send my location', request_location=True)],
            [KeyboardButton(text='🎉')]
        ],
        one_time_keyboard=True,
    )
    bot.sendMessage(chat_id, 'Press a button on the custom keyboard', reply_markup=keyboard) # Send custom keyboard


# Generate and display an inline keyboard in the bot chat, triggered by sending "Inline keyboard"
def send_inline_keyboard(chat_id):
    keyboard = InlineKeyboardMarkup(
        inline_keyboard=[
            [
                InlineKeyboardButton(text='A', callback_data='You chose option A'),
                InlineKeyboardButton(text='B', callback_data='You chose option B'),
            ],
        ],
    )
    bot.sendMessage(chat_id, 'Choose one of the following options', reply_markup=keyboard) # Send custom keyboard


# Function called by button press in Inline keyboard
def on_callback_query(msg):

    query_id, from_id, query_data = telepot.glance(msg, flavor='callback_query')

    #bot.answerCallbackQuery(query_id, text='Got it')
    bot.sendMessage(from_id, query_data)


MessageLoop(bot, {'chat': handle_msg, 'callback_query': on_callback_query }).run_as_thread()

print('Listening...')
while True:
    time.sleep(5)
let’s break it down and see what it is doing. Our main focus is to add a functionality to receive and send voice messages inside handle_msg function.
1. Make our Bot Recognize Voice Messages
Let’s have a look at our main.py. In the previous tutorial, we told the bot what to do when it receives a text.
# The message in the chat is a text message
if content_type == 'text':
    msg_content = msg['text'].strip()         # Get message content and remove potential whitespaces on the sides

    if msg_content == 'Custom keyboard':
        send_custom_keyboard(chat_id)
    elif msg_content == 'Inline keyboard':
        send_inline_keyboard(chat_id)
    else:
        bot.sendMessage(chat_id, test_reply)
Now we need to have the case for when the bot receives a voice message after the above code. A voice message has the content type of ‘voice’, so after the above code we have this:
# The message in the chat is voice message
elif content_type == 'voice':
    # Save the voice message as "voice_message.ogg"
    file_name = "Part B/voice_message.ogg"
    store_audio_file(bot, msg, file_name)   # Use file_handler.py's store_audio_file function

    # Transcribe voice message to text
    transcription = get_transcription(file_name)    # Use whisper.py's get_transcription function
    print("Received message: " + transcription)

    # Generate response with ChatGPT
    print("Generating a response...")
    answer = response(transcription)    # Use chat_gpt.py's response function

    # Convert the response into speech
    print("Saving response as a voice file...")
    text_to_speech(answer)              # Use tts.py's text_to_speech function
    print("Audio saved as voice_response.mp3")

    # Send voice message in Telegram
    bot.sendVoice(chat_id, open("Part B/voice_response.mp3", "rb"))
This code handles the behaviour of the bot when it receives a voice message. Let’s look into the details of this block.
2. Transcribe the Voice Message Into Text
This section considers the below part of the code block:
# Save the voice message as "voice_message.ogg"
file_name = "Part B/voice_message.ogg"
store_audio_file(bot, msg, file_name)   # Use file_handler.py's store_audio_file function

# Transcribe voice message to text
transcription = get_transcription(file_name)    # Use whisper.py's get_transcription function
print("Received message: " + transcription)
Because we will use ChatGPT to generate the response that the Telegram bot sends, we need to turn the voice message into a format that ChatGPT can understand, which is text (or string, in programming terms).
In order to turn voice into text, we first need to download the voice message. The following code downloads the voice message as “voice_message.ogg” file and saves it in Part B folder.
# Save the voice message as "voice_message.ogg"
file_name = "Part B/voice_message.ogg"
store_audio_file(bot, msg, file_name)   # Use file_handler.py's store_audio_file function
The store audio file function is from file_handler.py, which uses telegram’s API to download contents.
Alright, now that we have the voice message saved, let’s turn this into text using whisper.py we have seen before.
# Generate response with ChatGPT
print("Generating a response...")
answer = response(transcription)
We are using speech to text function in whisper.py to transcribe our voice message. Now what we said is saved in the variable “transcription” as string. We are using this as a prompt to the ChatGPT to generate a response.
3. Generating a Response
This section considers the below part of the code block:
# Generate response with ChatGPT
print("Generating a response...")
answer = response(transcription)
Here, we are creating the text for what the bot will say to us, using the ChatGPT API (responsefunction). This is something we’ve seen many times already.
4. Use Text to Speech to Generate Audio
# Convert the response into speech
print("Saving response as a voice file...")
text_to_speech(answer)
print("Audio saved as voice_response.mp3")
Here we are using tts.py’s text to speech method to turn the generated response into an mp3 file.
5. Send Voice Message Back
The last thing we need to have here is to actually make the bot send the voice message to us.
# Send voice message in Telegram
bot.sendVoice(chat_id, open("Part B/voice_response.mp3", "rb"))
Notice how our code now is different from the old code we had.
# The message in the chat is voice message
elif content_type == 'voice':
    # Save the voice message as "voice_message.ogg"
    file_name = "Part B/voice_message.ogg"
    store_audio_file(bot, msg, file_name)   # Use file_handler.py's store_audio_file function

    # Transcribe voice message to text
    transcription = get_transcription(file_name)    # Use whisper.py's get_transcription function
    print("Received message: " + transcription)

    # Generate response with ChatGPT
    print("Generating a response...")
    answer = response(transcription)    # Use chat_gpt.py's response function

    # Convert the response into speech
    print("Saving response as a voice file...")
    text_to_speech(answer)              # Use tts.py's text_to_speech function
    print("Audio saved as voice_response.mp3")

    # Send voice message in Telegram
bot.sendVoice(chat_id, open("Part B/voice_response.mp3", "rb"))# perform actions when voice message is received
elif content_type == 'voice':
text = 'You sent a voice message!'
# Send message
bot.sendMessage(chat_id, text) In contrast to the last function we used to send a message (”bot.sendMessage()”), we are using bot.sendVoice() here to send a voice message.
Also, for the content of the message, instead of the text‘You sent a voice message!’,we are now sending “open(”voice_response.mp3”, “rb”) - the audio file we generated in step 4. The important thing is knowing how we created this audio file:
- We saved the audio file
- We Transcribed it to text using speech-to-text
- We used the text as a prompt to generate a response
- Finally we generate the audio using text-to-speech
And we have it! Now that we know how the bot processes voice messages, let’s test it.
Run main.py and send a voice message to the Telegram bot. See what you get!
This concludes the tutorial for this part. We have seen how we can use different generative AI’s to expand the ability of our bot.
Be ambitious: you can explore the Telepot’s API further and implement more creative functions yourself! Maybe you can make it send an image to you, or make it do more cool stuff.
If you have any questions on how to expand your bot, ask the technical TA’s: we are always happy to help.
Part C: - Integrating with P5.js
In part C, we will connect the text-to-speech from part B to a P5 sketch. The folder structure in VS Code should look like this:
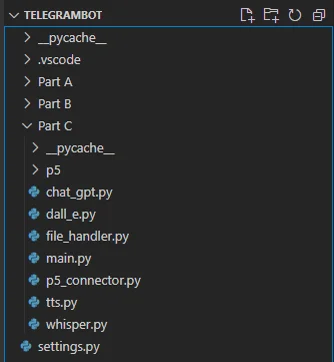
The new additions here are p5_connector.py and the p5 folder. Also, ensure that the folder .vscode is in the workspace and on the top level, as we need this to start p5 later.
For this example we will create a story telling platform. The user will give us a voice prompt via telegram, asking for a short story about a topic. The example used here is the following:
“Please tell me a short story about a wizard.”
C1 - The connection
We need Web sockets to connect Python and P5 (JavaScript). This is a protocol that allows for instant messaging between a webpage and some other application.
In p5_connector.py, we set up a WebSocket server so that our p5 sketch can connect to it. You do not need to understand any of the code in this file. The only function that could be of interest is the new_story and broadcast_new_storyfunctions. If you want to change the message that is sent to p5 you can modify these functions.
# This function takes a story id and tells the websocket server to broadcast
def new_story(story_id: str):
    asyncio.run(broadcast_new_story(story_id))

# This Websocket server function will take a story Id and append it to a message.
# This message wil be send to all connected p5 instances
async def broadcast_new_story(story_id: str):
    # Call broadcast function to send the message to all clients
    await broadcast(f"New story [{story_id}]")
C2 - The Telegram Bot
For this example, we will work with a slightly modified version of the Part B code. This version has added the option to provide a file path to the TTS and image-generation functions in the files dall_e.py and tts.py
But let us focus on the changes in the main.py file.
We want our bot to do the following:
- Receive voice messages
- Transcribe these voice messages
- used the transcribed prompt to let Chat-GPT generate a story
- Create image and audio for the story.
- Give the response from Chat-GPT to the TTS module and save the audio file
- Insert the response from Chat-GPT into a image generation promt create a image for the story
- Send the message to P5 to show the image and play the audio
- We also send the audio and image back to telegram as backup
Below is the whole main.py code:
import sys
import time
import telepot
import random
import string
from pathlib import Path
from telepot.loop import MessageLoop
from telepot.namedtuple import InlineKeyboardMarkup, InlineKeyboardButton, ReplyKeyboardMarkup, KeyboardButton
from chat_gpt import response
from whisper import get_transcription
from file_handler import store_audio_file
from tts import text_to_speech
from dall_e import generate_image
from p5_connector import start_connector, new_story

sys.path.append('../TelegramBot')
from settings import settings

TOKEN = settings['botToken']
bot = telepot.Bot(TOKEN)

test_reply = 'Wohoo, it works!!!'

def handle_msg(msg):

    content_type, chat_type, chat_id = telepot.glance(msg)      # Extract message data

    # The message in the chat is a text message
    if content_type == 'text':
        bot.sendMessage(chat_id, test_reply)

    # Step 1: The message in the chat is voice message
    if content_type == 'voice':

        # Save the voice message
        file_name = "Part C/voice_message.ogg"
        store_audio_file(bot, msg, file_name)

        # Step 2: Transcribe voice message to text
        transcription = get_transcription(file_name)
        print("Received message: " + transcription)

        # Step 3: Generate response with ChatGPT
        print("Generating a response...")
        answer = response(transcription)

        story_id = ''.join(random.choices(string.ascii_lowercase, k=6)) # Create a string of 6 random letters

        # Step 4.a:  Convert the response into speech
        print("Saving response as a voice file...")
        audio_file_output = f"./p5/story/{story_id}-audio.mp3"
        text_to_speech(answer, audio_file_output)
        print(f"Audio saved as {audio_file_output}")

        # Step 4.b: Create an image for the message
        print("Generating image...")
        image_output = f"./p5/story/{story_id}-image.jpg"
        # Here we use a custom prompt
        generate_image(f"Generate an image without text for the following story: {answer}", image_output)
        print(f"Image saved as {image_output}")

        # Step 5: Send command to p5 to load a new story
        new_story(story_id)

        # Step 5.a (extra): Send voice message and image in Telegram
        parent_path = Path(__file__).parent
        bot.sendVoice(chat_id, open(parent_path / audio_file_output, "rb"))
        bot.sendPhoto(chat_id, open(parent_path / image_output, "rb"))


# Function called by button press in Inline keyboard
def on_callback_query(msg):

    query_id, from_id, query_data = telepot.glance(msg, flavor='callback_query')

    #bot.answerCallbackQuery(query_id, text='Got it')
    bot.sendMessage(from_id, query_data)


MessageLoop(bot, {'chat': handle_msg, 'callback_query': on_callback_query }).run_as_thread()
print('Listening...')

# Start the p5 connector
start_connector()
There are three main changes to this file.
First we removed some of the custom keyboard code as that is not used in this example. Feel free to add this back in if you want to use custom keyboards.
Secondis the line at the bottom. In stead of a while True loop it now calls start_connector(). This will start the WebSocket server and allow for P5 to connect to main.py and for us to use new_story() in main.py
Third is the contents of def handle_msg(msg):
def handle_msg(msg):

    content_type, chat_type, chat_id = telepot.glance(msg)      # Extract message data

    # The message in the chat is a text message
    if content_type == 'text':
        bot.sendMessage(chat_id, test_reply)

    # Step 1: The message in the chat is voice message
    if content_type == 'voice':

        # Save the voice message
        file_name = "Part C/voice_message.ogg"
        store_audio_file(bot, msg, file_name)

        # Step 2: Transcribe voice message to text
        transcription = get_transcription(file_name)
        print("Received message: " + transcription)

        # Step 3: Generate response with ChatGPT
        print("Generating a response...")
        answer = response(transcription)

        story_id = ''.join(random.choices(string.ascii_lowercase, k=6)) # Create a string of 6 random letters

        # Step 4.a:  Convert the response into speech
        print("Saving response as a voice file...")
        audio_file_output = f"./p5/story/{story_id}-audio.mp3"
        text_to_speech(answer, audio_file_output)
        print(f"Audio saved as {audio_file_output}")

        # Step 4.b: Create an image for the message
        print("Generating image...")
        image_output = f"./p5/story/{story_id}-image.jpg"
        # Here we use a custom prompt
        generate_image(f"Generate an image without text for the following story: {answer}", image_output)
        print(f"Image saved as {image_output}")

        # Step 5: Send command to p5 to load a new story
        new_story(story_id)

        # Step 5.a (extra): Send voice message and image in Telegram
        parent_path = Path(__file__).parent
        bot.sendVoice(chat_id, open(parent_path / audio_file_output, "rb"))
        bot.sendPhoto(chat_id, open(parent_path / image_output, "rb"))
handle_msg() is now fully focused on voice messages. text messages will always only receive the test reply. As mentioned before we added the option to specify file outputs here. As you can see with image_outputand audio_file_output . We save both our files in the storyfolder of the p5 folder. This is important as p5 can only access files that are inside of its own folder.
An other interesting addition is the generation of a random text string
story_id = ''.join(random.choices(string.ascii_lowercase, k=6)) # Create a string of 6 random lettersWe use this to create a unique identity for our stories. This way creating a new story doesn’t remove the old one.
C3 - P5 side
To start p5 you will need the live server extension. To install the plugin, move to the extension tab and search for “live server”
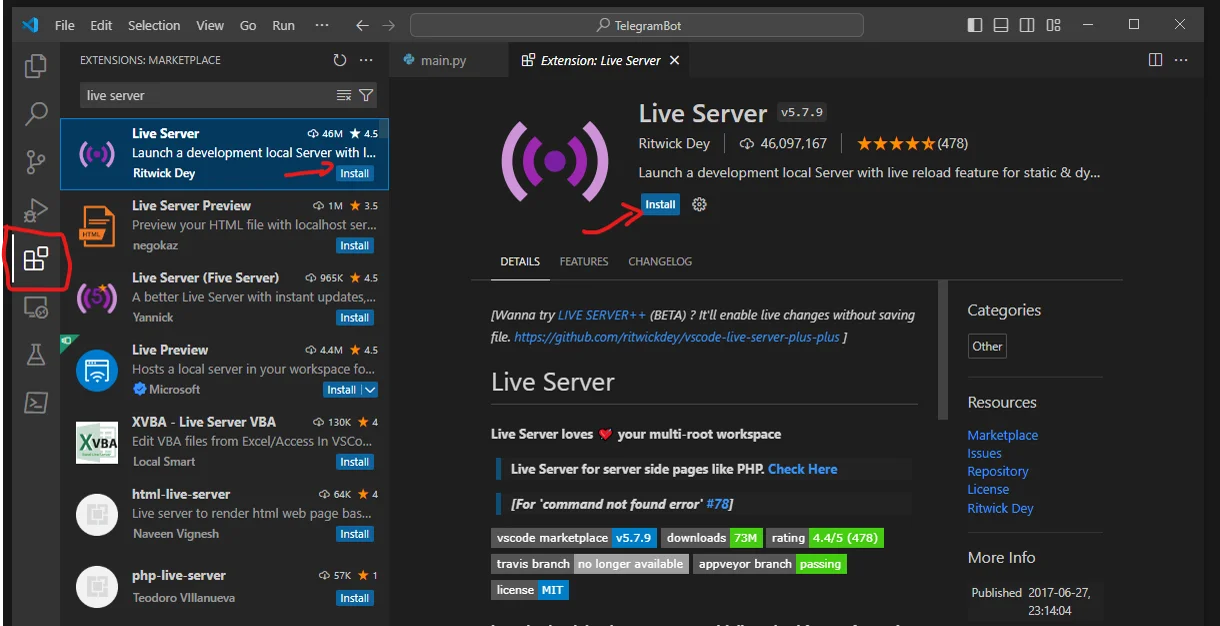
Once that is installed you can right click on the index.html in the p5 folder and select Open with live server
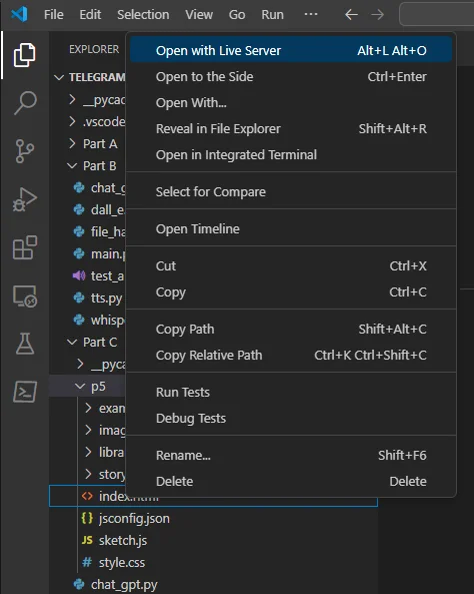
Doing that should open a browser looking like this:
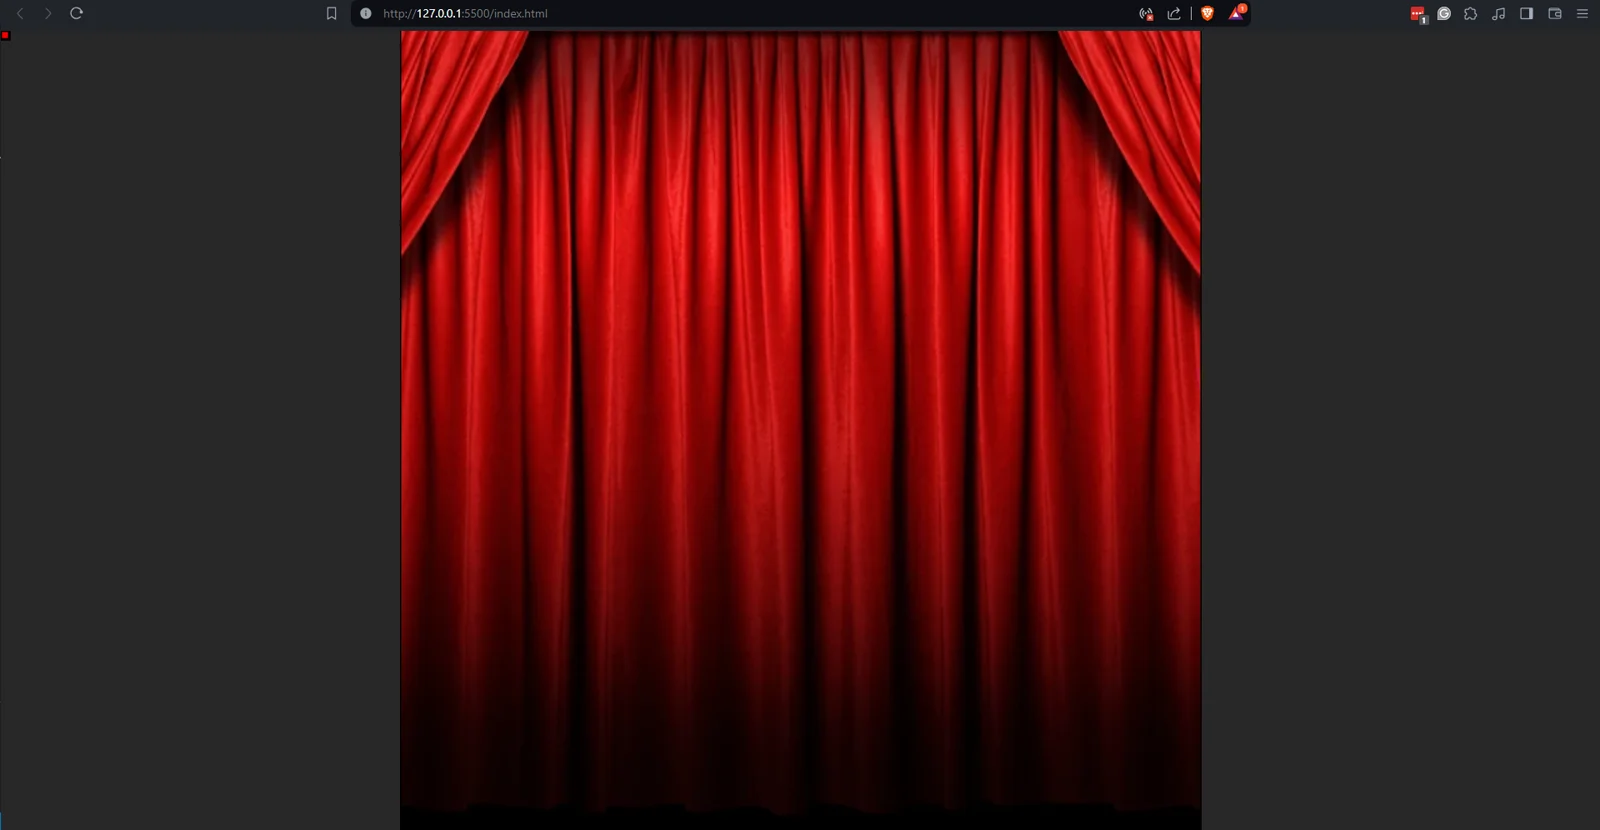
If the little square in the top left corner is red, that means thatmain.pyis not running.
You can test if it works by pressing “e” on the keyboard. This should start the example story.
All the p5 code is in the file called sketch.js .
// Create some variables for later
let x,y,smallestDimension,closedCurtain,openCurtain

let tellingAStory = false

let storyImage, storyAudio
let curtainCloseTimer

let connected = false

// Loads the images for the page is shown
function preload() {
  closedCurtain = loadImage("./images/no_image.png")
  openCurtain = loadImage("./images/image.png")
}


function setup() {
  // Create a full screen canvas
  createCanvas(window.innerWidth, window.innerHeight);

  // Dark gray background
  background(40)


  // -- DRAWING THE IMAGE BOX --
  // the image is 1024x1024 but our screen might be smaller so first lets find the smallest dimension.
  // we do this my taking the minimum from the width, height or 1024.
  smallestDimension = min(width, min(height, 1024))

  // Now we need to center the image. For this we need to find the top left x and y coordinates of where it should go.
  // lets find the x first. We do this by taking the center of the screen and subtracting half of the smallest dimension.
  x = width / 2 - smallestDimension / 2
  // The y is similar but here we use the height.
  y = height / 2 - smallestDimension / 2

  // Now we can draw the border
  // We don't want a fill
  noFill()
  // The border should be white
  stroke("black")
  // And we want lines of 3px wide
  strokeWeight(3)
  // now we use the previously calculated points to draw it
  rect(x, y, smallestDimension, smallestDimension)

  // Draw the closed curtains as there is no story to tell yet
  noStory()

  // -- CONNECTION STATUS --
  if (connected) {
    fill("green")
    rect(0,0,10,10)
  } else {
    fill("red")
    rect(0,0,10,10)
  }


  // Do not run the draw function as we only want to draw things when there is an update
  noLoop()
}

// This function will close the curtain on the canvas
function noStory() {
  // Save all the current drawing settings like colors and line sizes.
  push()

  // Draw the closed curtains.
  image(closedCurtain, x, y, smallestDimension, smallestDimension)

  // Restore the saved drawing settings.
  pop()
}


// This function will start a story.
// It assumes that the variables storyAudio and stroyImage contain the audio and image for story that should be told.
function startStory() {
  // Save all the current drawing settings like colors and line sizes
  push()

  // Draw the story image (if it exists).
  if (storyImage){
    image(storyImage, x, y, smallestDimension, smallestDimension)
  } else {
    fill("black")
    rect(x,y,smallestDimension,smallestDimension)
  }
  // Draw the open curtains. This should happen after drawing the story image.
  image(openCurtain, x, y, smallestDimension, smallestDimension)

  // Ready the story audio (if it exists).
  if (storyAudio){
    // Add an event for when the audio is done playing.
    storyAudio.onended(() => {
      // After 2 seconds run the following code.
      curtainCloseTimer = setTimeout(() => {
        tellingAStory = false
        // Move back to the non story view.
        noStory()
      }, 2000)
    })
    // Start the audio of the story
    storyAudio.play()
  }
  tellingAStory = true

  // Restore the saved drawing settings
  pop()
}

// Load the story with the given story id.
// it looks in the story folder for an image and audio file with the given story id.
async function loadStory(storyId) {

  // load the image
  storyImage = await waitLoadImage(`./story/${storyId}-image.jpg`)
  // load the audio
  storyAudio = await waitLoadSound(`./story/${storyId}-audio.mp3`)
  // The await keyword is a special option in javascript that ensures the code waits for it to be ready before moving on.
  // note that we can only use "await" in a function that has the label "async" and on operations that support it.
  // Start a story when all is loaded
  startStory()
}

// Load the story saved in the example story folder.
async function loadExampleStory() {
  // load the image
  storyImage = await waitLoadImage("./example_story/image.jpg")
  // load the audio
  storyAudio = await waitLoadSound("./example_story/audio.mp3")
  // The await keyword is a special option in javascript that ensures the code waits for it to be ready before moving on.
  // note that we can only use "await" in a function that has the label "async" and on operations that support it.
  // Start a story when all is loaded
  startStory()
}


// This checks for key presses.
// To check the code of a key you can use this website: https://www.toptal.com/developers/keycode
// You can use this function as a way to test/debug things
// Or you can add user interaction through the keyboard.
function keyPressed() {
  // Print the key to the console
  console.log(keyCode);

  // Check for the space key.
  if (keyCode === 32) {
    // Retell the story if the space key is pressed
    if (tellingAStory) {
      tellingAStory = false

      // Stop the audio if it exists
      if (storyAudio){
        clearTimeout(curtainCloseTimer)
        storyAudio.stop()
      }
      noStory()
    } else {
      tellingAStory = true
      startStory()
    }
  }

  // Check for the "e" key.
  if (keyCode === 69) {
    // Play the example story.
    if (tellingAStory) {
      tellingAStory = false

      // Stop the audio if it exists
      if (storyAudio){
        clearTimeout(curtainCloseTimer)
        storyAudio.stop()
      }
      noStory()
    }
    tellingAStory = true
    loadExampleStory()
  }
}


// Code to connect the main.py code to p5
// Start a connection with the local computer on port 8765
const connection = new WebSocket("ws://localhost:8765")

// Check if the connection is open, if so tell us about it in the console (the inspect elements menu (F12))
connection.addEventListener("open", (event) => {
  connected = true
  console.log("Connected!")
})

// Check if the connection closed, if so tell us about it in the console (the inspect elements menu (F12))
connection.addEventListener("close", () => {
  fill("red")
  rect(0,0,10,10)
  console.log("Disconnected!")
})

// Listen for messages send from the main.py code.
connection.addEventListener("message", (event) => {
  // Log the message to the console for debug purposes.
  // if everything works you can remove this line
  console.log(`Message: ${event.data}`);

  // Check if the message we got from main.py contains the phrase: "New story"
  if (String(event.data).includes("New story")){
    // Get the story Id from the message
    // first by splitting it on "[" creating a list: ["New story ", "xxxxxx]"]
    // and then we spilt the second part on "]" creating a list ["xxxxxx"]
    const storyId = event.data.split("[")[1].split("]")[0]
    // If so, load the new story!
    loadStory(storyId)
  }
})


// Some helper code to make loading sounds an images easier.
// You don't have to understand any of this. Just know that this makes the "await" option possible.
function waitLoadImage(url) {
  return new Promise((resolve, failure) => {
      loadImage(url, (img) => {
        resolve(img)
      }, (fail)=> {
        failure(fail)
      })
  })
}

function waitLoadSound(url) {
  return new Promise((resolve, failure) => {
    loadSound(url, (sound) => {
      resolve(sound)
    }, (fail)=> {
      failure(fail)
    })
  })
}
This file has a lot of comments that should explain how it works.