Part 0 - Requirements
0A - Installing Visual Studio code & Python
Visual Studio Code (or VS Code)
- Windows installer
- Follow the instructions from the installer, the features checked by default work perfectly fine, but if there’s anything that you want to change feel free to do it.
- MacOS installer
- Extract the content of the downloaded .zip file
- Drag
Visual Studio Code.appto the Applications folder, making it available in the macOS Launchpad.
Python
You need to make sure you have python installed in your system before actually starting the tutorial.
Windows
- Download this installer and run it
- Then be sure to
- FIRST check the box in the bottom of the windows that says “Add Python 3.10 to PATH”
- Then proceed with the installation.
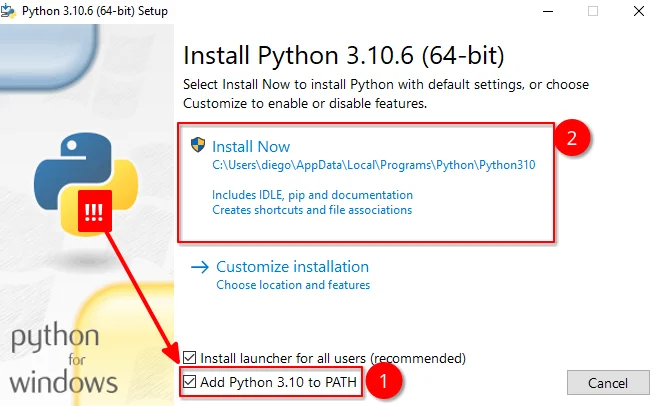
Once the installation is done you can close the installer and proceed with the tutorial.
MacOS
Python should already be installed on your system, to verify it open the terminal application, paste the following command and press enter
python3 --versionIf the terminal returns something like Python 3.**.** it means that python is installed on your laptop and you can proceed with the tutorial.
Otherwise use this installer to install python
Code
Download and extract the following zip file containing the python code that you’re going to use for this tutorial. for the purpose of this tutorial it does not matter where to locate the folder. But trying to manage your codes is a good practice 😉
The zip file contains 3 python files with the following code
ChatGPT.py→ containing code to make ChatGPT queries
dall-e.py→ containing code to generate DALL-E images
settings.py→ where you should put the API key for OpenAI
0B - Opening a project with VS Code
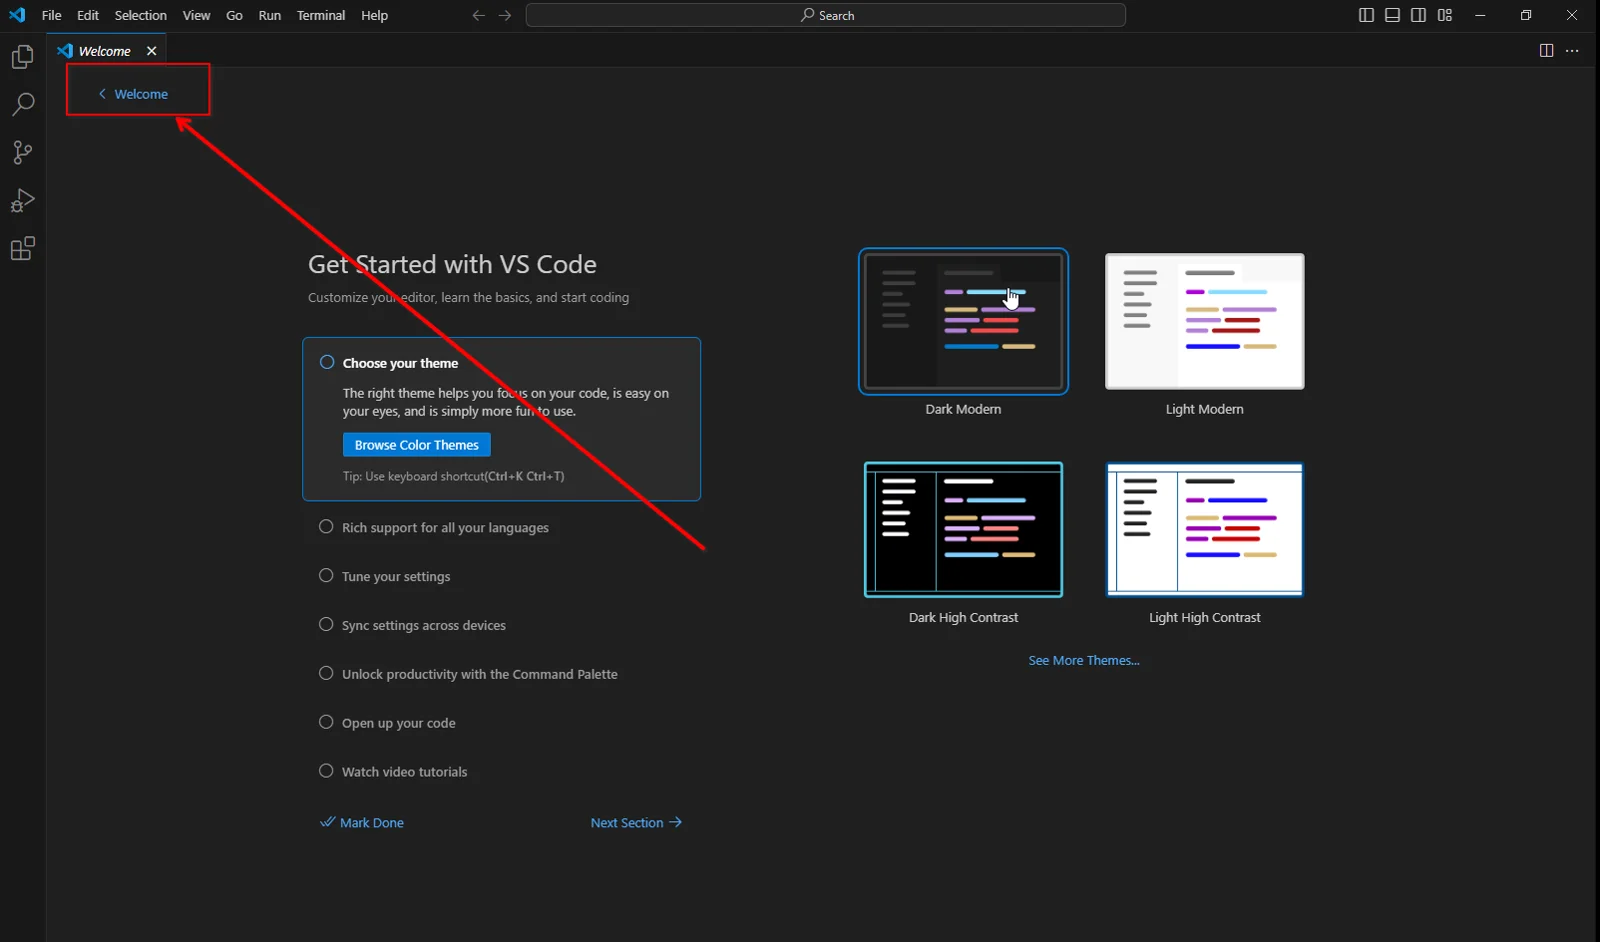
Once everything is installed open VS Code and press on the “Welcome” button in the top-left of the screen, then press on “Open folder”
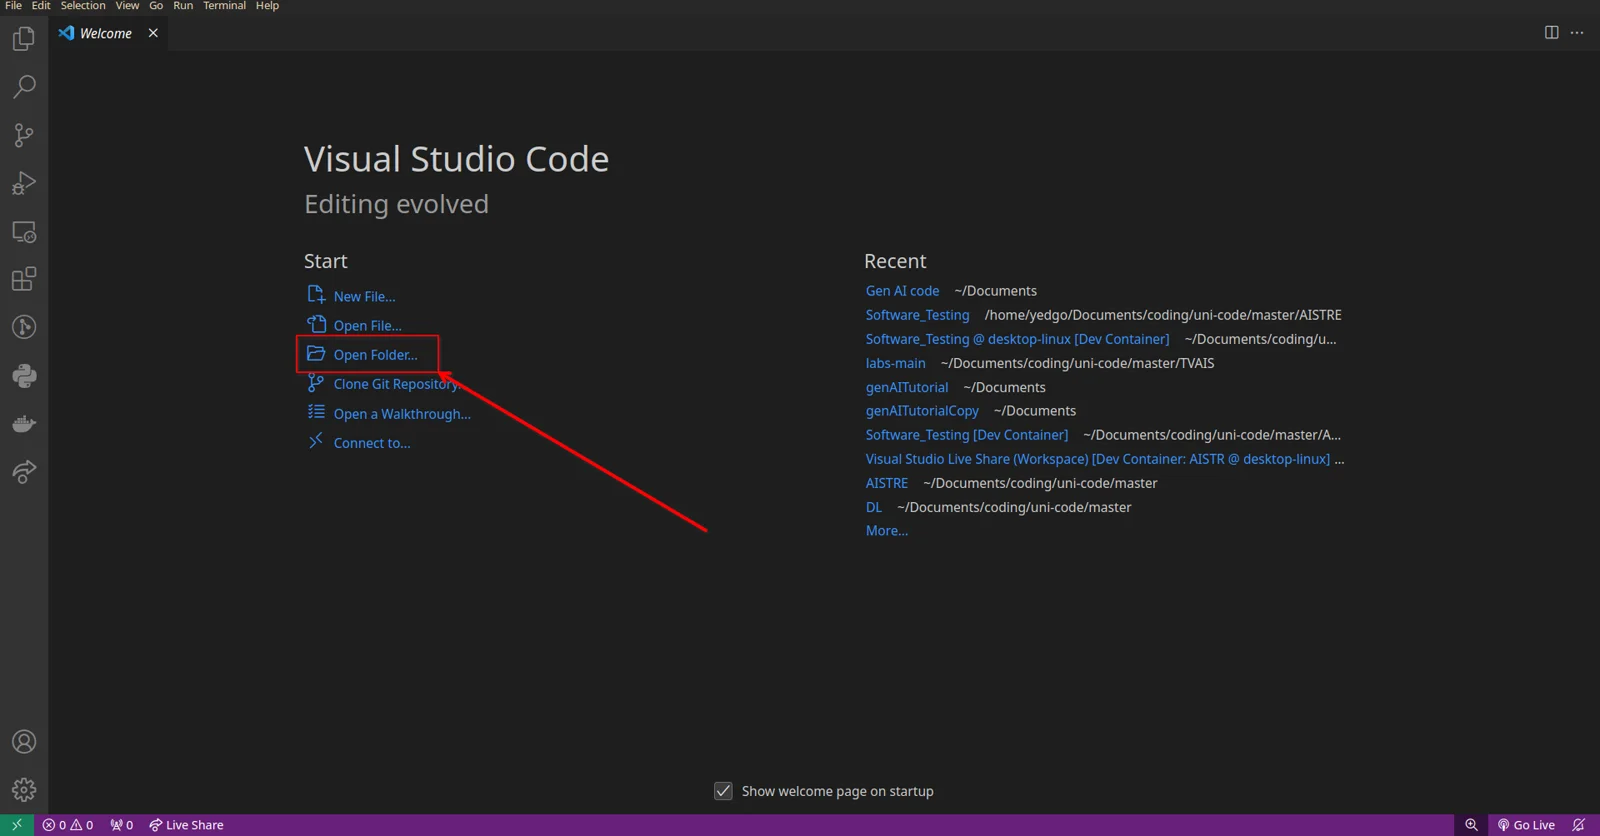
Locate the extracted zip file and press open
Your editor should look something like this:
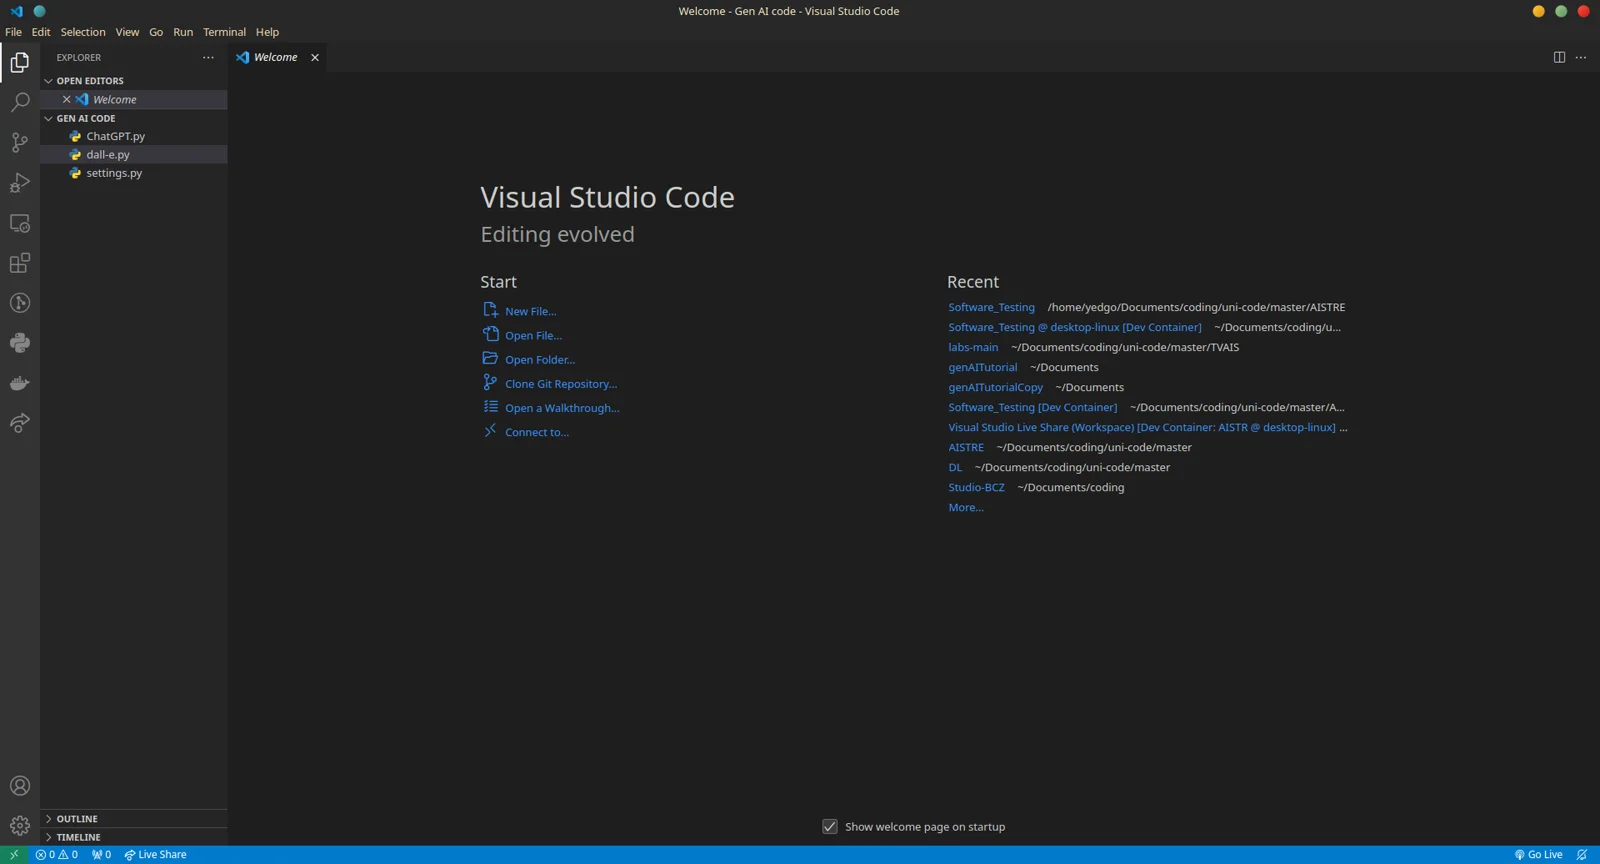
On the left-side bar we can now see the files ChatGPT.py, dall-e.py and settings.py
From here we open/create/delete/rename the files contained in our project.
Let’s open ChatGPT.py by double-clicking on it to see the content of the file:
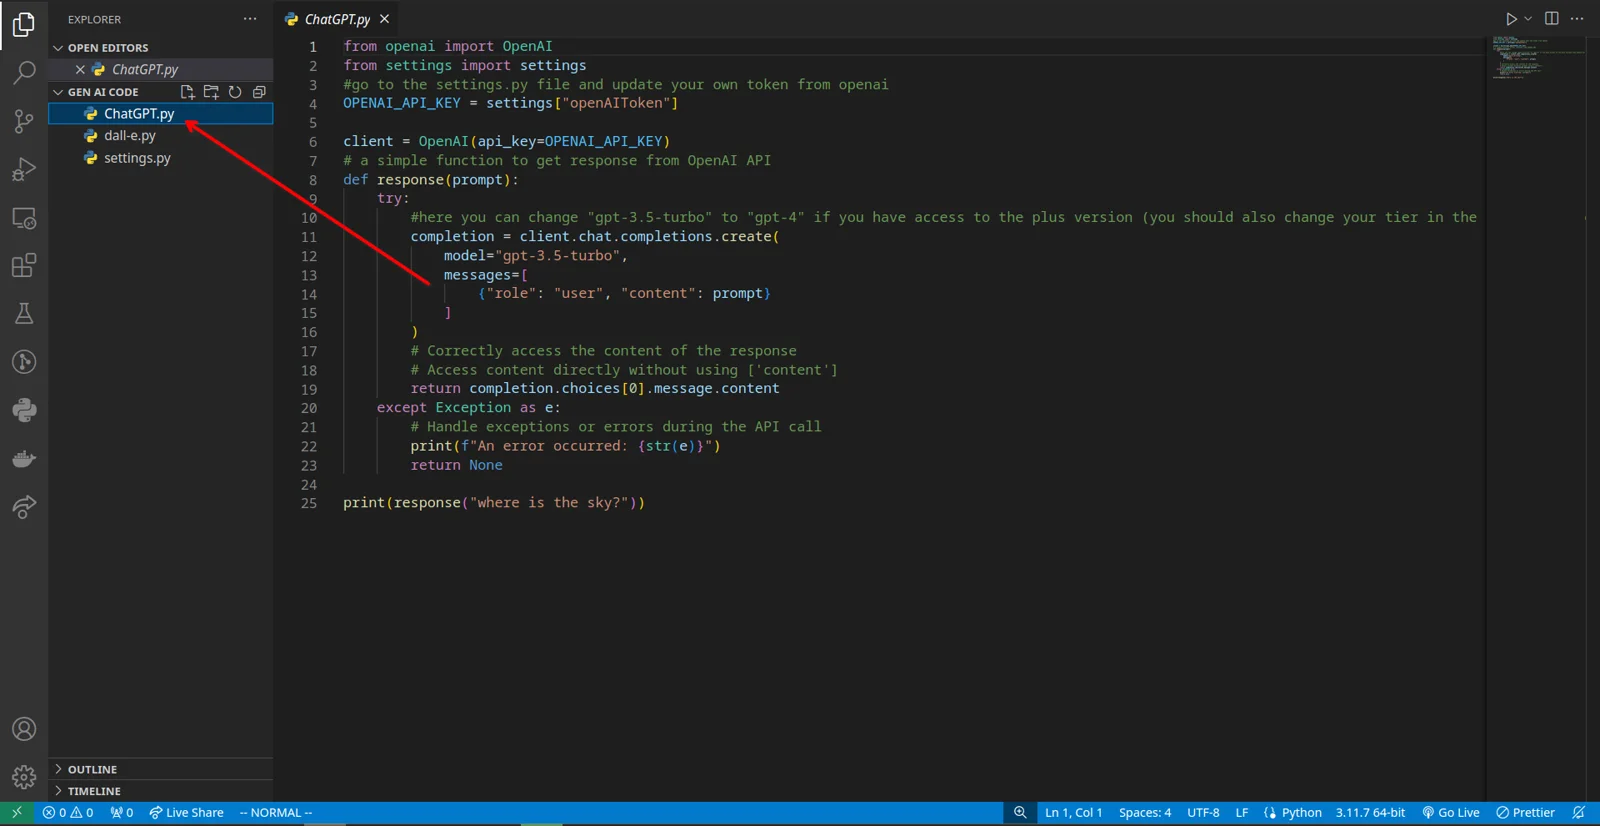
0C - Installing Python libraries
In the top left of the screen click on the “Terminal” option and select “New terminal”
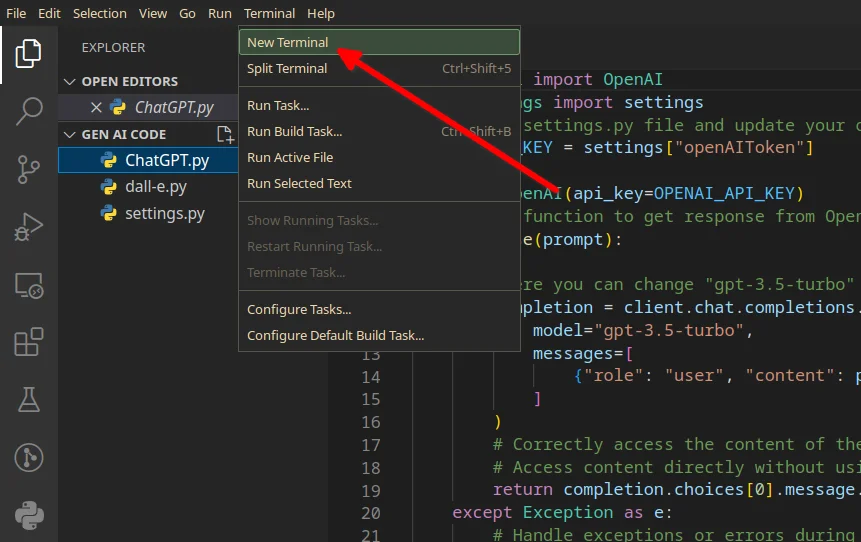
Now paste the following line and press enter.
pip install openai requestsIf this doesn’t work try changing pipinto pip3
Your computer will start installing the required libraries and a lot of text and numbers will start appearing in your terminal, let it run until it stops.
If everything went smoothly you should see something looking like this in your terminal.

Or you may see something like this if it was already installed before.

0D - Generating an OpenAI API key and pasting it in the project
Note:For the context of ITD 2024, we give each team a unique API key, meaning that you don’t need to do that for the tutorial. But please take a look to understand how it happens.
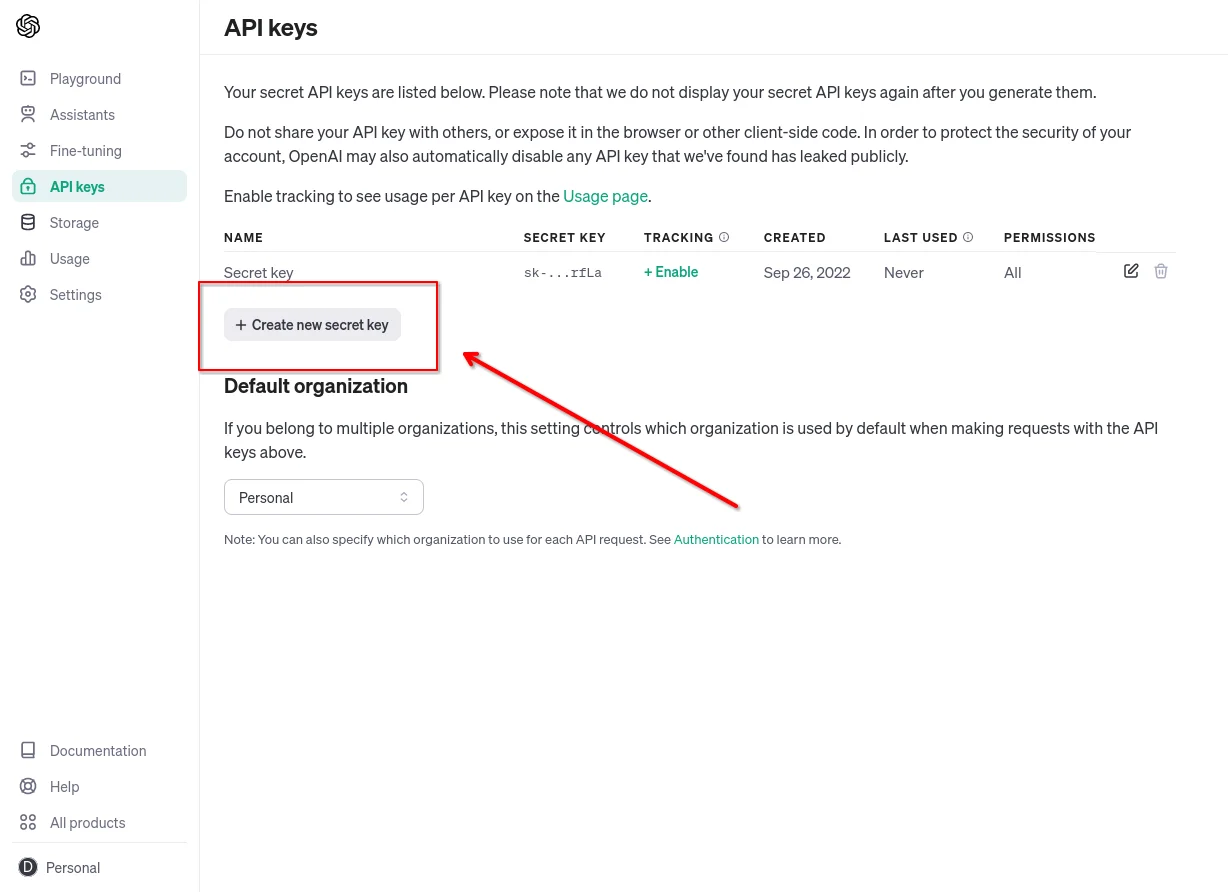
Open the following link and press the “Create new secret key” button to create an API key for OpenAI
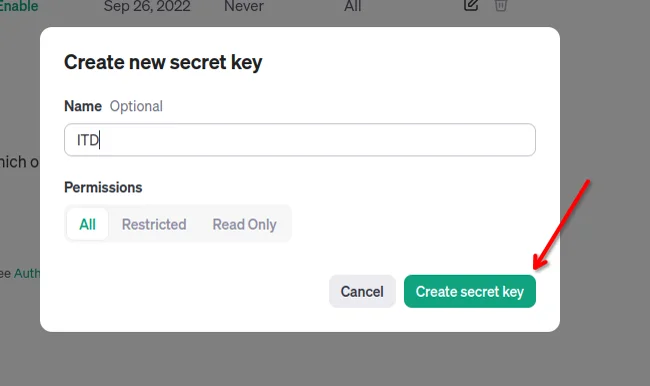
Name your key something and click on “Create secret key”. The name is just for better management.
Now copy your generated key and paste it in the settings.py file, be sure not to delete the quotes on the sides of the pasted key.
Your settings.py file should look like this
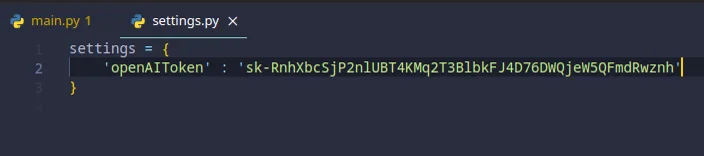
Save the file by hitting Ctrl + s on windows or Cmd + s on mac or by going in the File section of the top-bar menu and pressing on Save.
You can see if a file has unsaved changes by checking if there’s a white dot next to the file name.
NOTE: If you already haven't received a Key from the Technical TAs please reach out to them for one. It is likely that your own generated keys don’t work immediately.
Unsaved file

Saved file
0E - Running Python code
Now that everything is set up, we can finally run our code!
Select the ChatGPT.py file, locate the run icon in the top right of the editor and click it
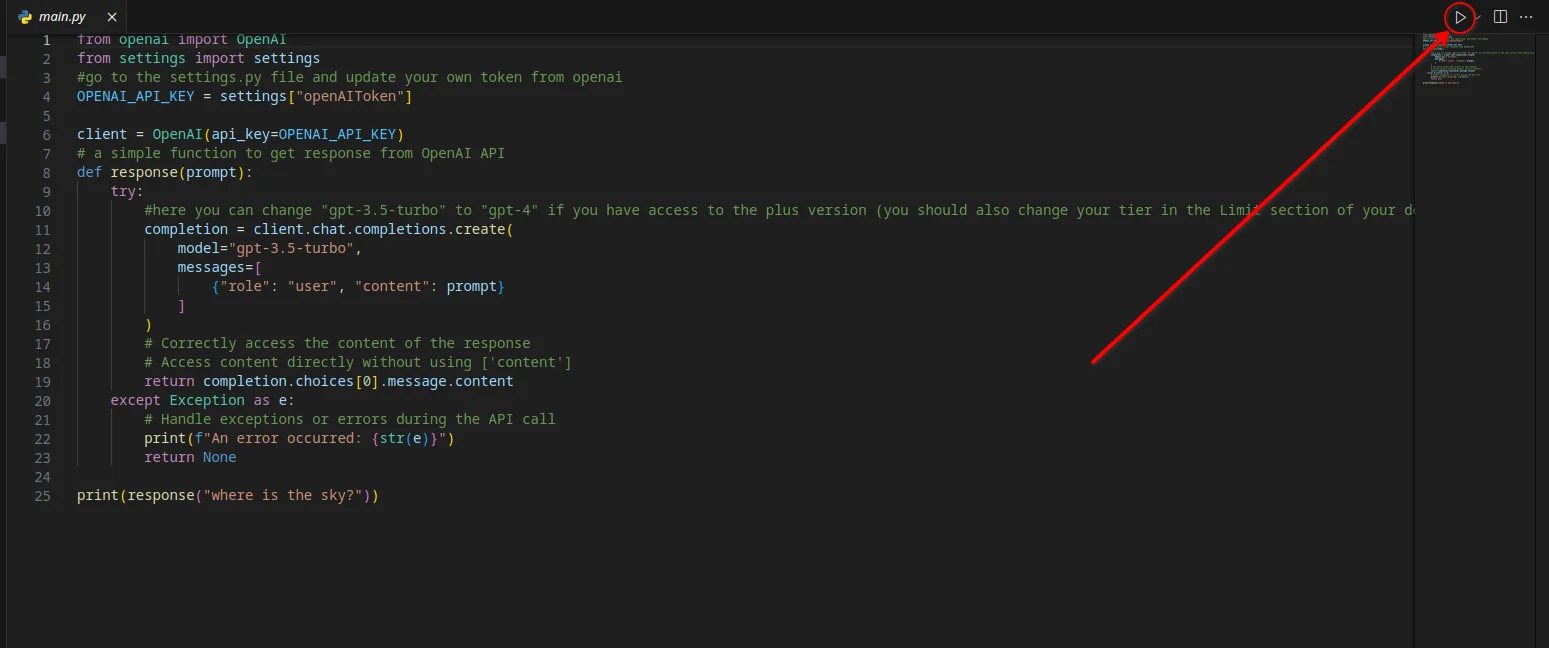
You should see that VSCode opens a new terminal for you, runs the code in the ChatGPT.py file and returns the output.
If everything went smoothly your output should look like this:
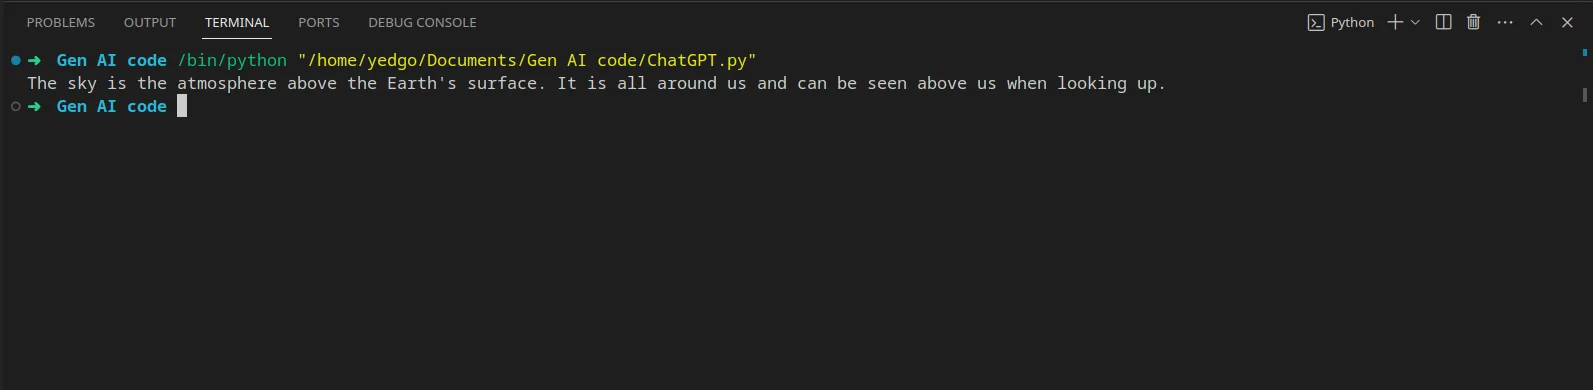
If you see an error that says:
An error occurred: Error code: 401 - {'error': {'message': 'Incorrect API key provided: sk-v37u9**************************************XJGc. You can find your API key athttps://platform.openai.com/account/api-keys.', 'type': 'invalid_request_error', 'param': None, 'code': 'invalid_api_key'}}
None
Something must be wrong with your API key in the settings.py file, please double-check that you pasted the key correctly.
Part A - Prompt engineering
Prompt engineering is the practice of fine-tuning the question/request asked to large language models like ChatGPT in order to achieve the desired result.
This practice could be compared to the process of writing a recipe for a cake, if you don’t specify all the steps and information clearly, the results may vary and the baked cakes may not be all as tasty.
Here are some guidelines that you can use in order to achieve better responses with large language models:
Write clear instructions
Unfortunately, these models can’t read your mind (at least not yet), in order to get a highly relevant response, make sure that requests provide any important details or context. Otherwise, you are leaving it up to the model to guess what you mean.
Bad query:
How do I add numbers in Excel?
Good query:
How do I add up a row of dollar amounts in Excel? I want to do this automatically for a whole sheet of rows with all the totals ending up on the right in a column called "Total".
General understanding of ChatGPT
In this Tutorial, we are assuming that you already have some experience working with the ChatGPT platform. Therefore, we want to move your expertise to the next level. If using ChatGPT feels unfamiliar to you, feel free to take a quick look at the topics we covered in our ChatGPT tutorial for some basic and useful understanding.
Tutorial: ChatGPT
We are encouraging you to use the following prompts in you ChatGPT.py
Specific strategies for crafting a prompt for certain results
1-Delimiting texts (clarity increase)
Here is a text to be summarized:
to_summarize=f"""
In addition to the weekly schedule, you are required to present your prototypes in an exhibition two times throughout the semester. These will be online or physical (on-site) depending on regulations and possibilities at the time. The final and intermediate exhibitions should feature your prototype(s), but also present the intended context of use in an experiential manner. As such, the staging of the exhibition is also a design challenge in itself that affects how your product/ result/ concept will be received.

As there are no presentations, the exhibition setup needs to be self-contained and “speak for itself”. A visitor to the physical or online exhibition should be able to figure out how to use the prototype by themselves and understand your concept’s purpose and meaning.

Each exhibition day will also include a peer-review exercise. The exhibitions are graded by the design coaches. Each exhibition has a different feel:
First exhibition: after 10  weeks of working with new technologies, you will have some very sketchy ideas, and (at least) three prototypes representing different design directions. This exhibition is about showing the potential, by describing concepts with early prototypes. The first exhibition will take place on Friday afternoon, April 21st.
Second and final exhibition: this concludes the course, and should be the fullest expression of your concept, with one or more interactive, experiential and beautiful prototypes. It can and should include dressing the space to create an experience, finalised designs of the things that you have made, character performances from the team and so on. The final exhibition will take place on Wednesday June 28th.
"""
you can ask the mode to summarize it . In order to prevent confusion we also tell the delimit passages by some clear characters (backticks here) to prevent confusion for the model
summary = f"""
Summarize the text delimited by triple backticks into a single sentence.
```{to_summarize}```
"""
Changing prompts and sending different requests to the API
In order to use this in your initial code you should add the to_summarize and summary variables underneath the code as below. The print(response(summary)) will consider the summaryvariable as the prompt.
from openai import OpenAI
from settings import settings
#go to the settings.py file and update your own token from openai
OPENAI_API_KEY = settings["openAIToken"]

client = OpenAI(api_key=OPENAI_API_KEY)
# a simple function to get response from OpenAI API
def response(prompt):
    try:
        #here you can change "gpt-3.5-turbo" to "gpt-4" if you have access to the plus version (you should also change your tier in the Limit section of your dev account)
        completion = client.chat.completions.create(
            model="gpt-3.5-turbo",
            messages=[
                {"role": "user", "content": prompt}
            ]
        )
        # Correctly access the content of the response
        # Access content directly without using ['content']
        return completion.choices[0].message.content
    except Exception as e:
        # Handle exceptions or errors during the API call
        print(f"An error occurred: {str(e)}")
        return None

#copy and paste to_summarize and summary here
....

#here the summary variable that you copied above would act as the prompt
print(response(summary))
2-Sentiment and emotion extraction
LLMs can easily extract sentiment and emotions from any given text
sentimented=f"""
In the realm of technology and design, the recent advancements have been nothing short of revolutionary, filling enthusiasts and professionals alike with a sense of awe and optimism. The seamless integration of intuitive interfaces with robust functionality in the latest software tools is a testament to the ingenuity and forward-thinking approach of modern designers. These innovations not only enhance productivity but also inspire creativity, allowing users to transcend traditional boundaries and explore new horizons. The elegance and efficiency embedded in these technological marvels speak volumes about the bright future of digital craftsmanship, making it an exciting time to be part of this dynamic field"""
prompt = f"""
Briefly tell me about the sentiments and emotions in this text delimited in triple backticks.
Text:
```{sentimented}```
"""
Do the same process about changing the promptsto test!
3-Instructions extraction (clarity increase)
Imagine there is a text you want to read in order to find how to do something. Then LLMs can help you:
nested_process=f"""
To utilize a GPT-3 instance within your personal application, or to integrate your account with external software, an API key is necessary. This key acts as a unique identifier that allows these applications to interact with the GPT-3 service. To obtain it, you need to access your account settings. This can be accomplished by locating and clicking on the "Personal" option situated in the upper right corner of your account interface. Upon doing so, a drop-down menu will appear. From this menu, select the option titled "View API keys". This will navigate you to a page displaying any preexisting API keys associated with your account. If you wish to generate a new key, simply click on the button labeled "Create a new secret key". Once clicked, a unique API key will be generated and displayed. Ensure to copy this key and securely store it, as you'll need to input it into your chosen application to establish the connection with the GPT-3 service."""
You can do so by using a prompt similar to this:
step_extract=f"""
you are given a text delimited by triple backticks into a single sentence. if the text contains instruction rewrite it in the following format:

step 1:...
step 2:...
step 3:...
.
.
.
step N:...
If the text does not contain a sequence of instructions then simply write "No Instruction found"

```{nested_process}```
"""
Do the same process about changing the promptsto test!
4-Steps for performing tasks (time for the model to think)
Dividing one complicated task into smaller tasks can prevent confusion for the model and ensure more precise results:
text = f"""
In a cutting-edge tech design course, students John and Jane embarked on a project to build an innovative AI model. As they delved into the complexities of machine learning, they faced numerous setbacks. John's code crashed repeatedly, and Jane struggled with data preprocessing. Despite these hurdles, they persevered, learning valuable troubleshooting skills. By the end of the course, they had not only built a functioning model but also developed a newfound appreciation for the challenges and rewards of tech design.
"""
prompt = f"""
Perform the following actions:
1 - Summarize the following text delimited by triple backticks with 1 sentence.
2 - Translate the summary into French.
3 - List each name in the French summary.
4 - Output a json object that contains the following keys: french_summary, num_names.

Separate your answers with line breaks.

Text:
```{text}```
"""
Do the same process about changing the promptsto test!
5-Checking previous steps (reducing hallucination strategy)
First, find relevant information
Then answer the question (perform the task)
For example here you want to know about something:
prompt = f"""
Tell me about the SmartSkin Skincare App
"""
The model can respond to something very believable but completely non-existent. But instead of this, you can check if there is relevant information:
prompt = f"""
perform the following actions:
1- check your knowledge to see if you can find anything about smartskin skincare app
2-if you found information, please tell me about it
3-if you didn't find anything, please simply say: this app does not exists
"""
Do the same process about changing the promptsto test!
6-Directing answers (customized responses)
Remember our summary prompt? We can actually make the model summarize it with regard to certain aspects. For example, see what happens if you ask for focus on a certain angle:
summary = f"""
Summarize the text delimited by triple backticks with a focus on timeline into one sentence.
```{to_summarize}```
"""
Try experimenting with the alternative angles. Also try other wordings:
summary = f"""
Your task is to extract relevant information from the text delimited by triple backticks with a focus on timeline into one sentence.
```{toSummarize}```
"""
Do the same process about changing the promptsto test!
7-Structured output (computer responses)
We can ask the models for a variety of contents but we can also require them to answer us in certain formats. This is especially interesting if we need the LLM’s output to be the input from a piece of software or another program/automated process:
structured_output=f"""
come up with a list of made up TV series, their directors, and number of episodes, and the channel they were played on.
Provide them in JSON format with the following keys:
Series_ID, title, Director, Episode, Channel
"""
now go back to the sentiment previous strategies and try to structure the output for those prompts (e.g. structured output for sentiment and feeling extraction)
Part B: Image generation
We encourage you to also experiment with Stable diffusion by following this tutorial. However, for today, we center today’s activity around open AI’s Dall-E.
Dall-E OpenAI
OpenAI has many models for a variety of purposes. Besides from gpt-3.5-turbo that we used in the previous part we can also use "dall-e-3" which is a text to Image model
import requests
from openai import OpenAI
from settings import settings
#go to the settings.py file and update your own token from openai
OPENAI_API_KEY = settings['openAIToken']

client = OpenAI(api_key=settings['openAIToken'])
# a simple function to get response from OpenAI API
def generateImage(prompt: str):
    try:
        # here you could change "dall-e-3" to "dall-e-2" if you want different functionality. Check the link for more information
        # https://platform.openai.com/docs/guides/images/usage
        response = client.images.generate(
            model="dall-e-3",
            prompt=prompt,
            size="1024x1024",
            quality="standard",
            n=1
        )

        # get the url of the generated image
        image_url = response.data[0].url
        # Get image from request
        img_data = requests.get(image_url).content
        with open('output-image.jpg', 'wb') as handler:
            handler.write(img_data)

        # return the image url
        return image_url
    except Exception as e:
        # Handle exceptions or errors during the API call or file creation
        print(f"An error occurred: {str(e)}")
        return None

print(generateImage("a dog playing cards"))
Keep in mind that this block of code is using the same API key that you used for the ChatGPT prompt engineering tutorials (Part A).
you can also save your prompt into another variable and use it in your code just like what you did with prompt engineering strategies:
#Your image generation code
.
.
.
.
.
prompt="a dog playing cards in a cinematic style during in the moonlight"
print(generateImage(prompt))
You can also have fixed multiple variables combined together to construct a prompt:
style="in a cinematic style during in the moonlight"
preprompt="a dog playing cards "
prompt=preprompt+style
print(generateImage(prompt))
Next step (combining Part A and Part B)
Experiment on your own!
Try moderating the final prompt by adding limitations, or try controlling the flavors, styles or direction of the image generation process; you can do a lot!
What if you ask the combine GPT and Dalle?
What are some creative ways to combine these two models into one little experiment?
Can you make a code that 1) receives a text from you, 2) creates another text prompt, and 3) uses the generated text prompt to then, generate an image? Can a GPT model do that for you?
Have Fun!